
We can hardly imagine modern web development without the help of Command Line Interface (CLI) tools. They tremendously facilitate and speed up the development workflow by reducing the amount of repetitive and tedious tasks. Setting up a project manually, with all the linting, building, testing, preprocessing, optimizing, and dependencies tracking features doesn’t sound like a fun job, does it?
That’s why all modern client-side development frameworks (such as Angular, React, etc.) offer their own version of CLI tools, and Vue.js is no exception. But with its latest third version, Vue CLI is going one step ahead of the others. It’s now not only highly powerful and flexible, but also comes with a full-blown GUI. Yeah, you heard right. Vue CLI 3 offers a full graphical user interface out-of-the-box.
Starting new Vue.js projects is now easier than ever with the new Vue CLI and it’s Vue UI GUI. This tutorial will show you how to put Vue CLI to use and how Vue UI can speed your workflow up even further. Let’s get started!
What Is Vue CLI?
Vue CLI is a set of tools for rapid prototyping, easy application scaffolding, and efficient project management. It’s composed of three main tool belts:
-
CLI is a globally installed npm package, which provides core functionality via the
vuecommand. It allows us to scaffold a new project easily (vue create), or just quickly prototype raw ideas (vue serve). If we want more concrete and visual control over our projects, we can open the GUI version of the CLI by runningvue uicommand. -
CLI Service is a development dependency (a
vue-cli-servicebinary file), installed locally into every project created with the CLI. It allows us to develop our project (vue-cli-service serve), pack it for production (vue-cli-service build), and also to inspect the internal webpack project’s configuration (vue-cli-service inspect). -
CLI Plugins are npm packages that provide additional features to our projects. Their names start with either
@vue/cli-plugin-(for built-in plugins) orvue-cli-plugin-(for community plugins). We can add them at any time of the development process viavue addcommand.
In the next sections, we’ll explore all nuts and bolts of the above tools and utilities, but first, let’s see the actual features that make Vue CLI so powerful and flexible.
Vue CLI is a Full-Featured System for Boosting Our Vue.js Development Workflow
Vue CLI accelerates and eases Vue.js project development thanks to its great collection of features. Let’s see what those features are:
- Plugin-based architecture. Vue CLI is totally built around plugins, which makes it very flexible and extensible. We can choose which ones of the built-in plugins to add during the project creation’s process. But we are not limited only to these, we can add any number of plugins at any time after creation of the project.
- Vue CLI is completely configurable, extensible, and upgradable.
- A set of official pre-installed plugins, which integrates first-class tools from the front-end ecosystem (Babel, ESLint, TypeScript, PWA, Jest, Mocha, Cypress, and Nightwatch).
- A single default preset, which we can modify to our needs during the project creation or afterwards.
- No need to eject. In contrast to React and Angular CLI tools, we can safely inspect and tweak our project’s webpack configuration at any time after creation without the need of ejecting the app and switching to manual configuration.
- Multi-page support.
- Instant prototyping without any configuration.
- Different build targets allow us to produce different versions of our project—we can use one and the same code base and build it as an app, a library, or web components.
- Modern mode feature. This will build our app for modern browsers, but with automatic fallback for older ones. Cool, huh?
- A full-blown GUI for creating, updating, and managing complex projects with ease.
- UI Plugin API. Vue UI exposes a plugin API which we can use to add custom functionality to the GUI version of the CLI.
- Lots of useful plugins from community.
Getting Started With Vue CLI
After we learn about the Vue CLI magic, it’s time to see it in practice. First, we need to install Vue CLI 3. It requires Node.js 8.9+ (8.11.0+ recommended), so we need to make sure we have it on our machines. Then we just open our terminal or command prompt, and run:
npm install -g @vue/cli
After the installation finished, we can start using the vue command. To check if everything works correctly, we run vue --version. This should display the installed Vue CLI version. Now, let’s explore what we can actually do with Vue CLI.
Instant Prototyping
Even though Vue CLI is designed primarily for working with complex projects, it allows us to try out our raw ideas quickly and effortlessly. Its instant prototyping feature can be activated by installing the global Vue CLI Service addon:
npm install -g @vue/cli-service-global
From now on, we can use vue serve command whenever we want. Let’s try it. We create an App.vue file with the following content:
Hello, Vue!
Then, in the same directory, we run:
vue serve
This will start the Vue CLI development server and will run the app on http://localhost:8080/. When we open the browser at this address, we should see a nice Hello, Vue! heading.
Creating a New Project
The previous section was only a warm up. Let’s now make something more complex.
vue create command uses an interactive process for selecting the options for a new project. Let’s run it and go throughout its options.
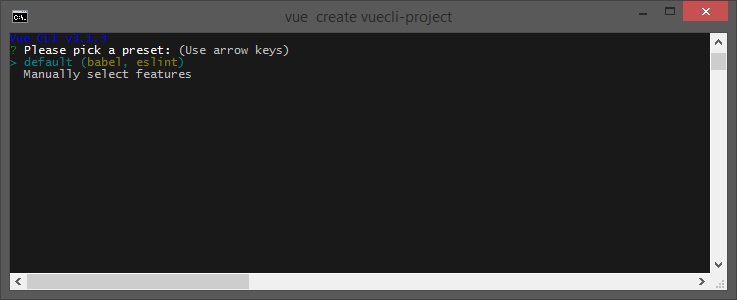
vue create vuecli-project
Create a New Project With Vue CLI

In the first window, we are invited to pick a preset. There is only one preset available out of the box, called default. We’ll choose the second option, which is to manually select the features we need for the project, and press Enter to continue.

In the next window, we use the arrow keys to navigate up and down the list of features and the spacebar to select what we want. Here, along with the already selected Babel and Linter/Formatter, I checked also Router and Vuex. Once you have selected the needed features, press Enter to move on.

In the next window, we are asked whether to use history mode for the router. I just pressed Enter to accept the default of Yes.

In the next window, we need to choose how we want to be configured the Linter. I selected ESLint + Prettier.

In the next window, we choose when the Linter is used to inspect the project. I chosen Lint on save, which applies each time a file is saved.

In the next window, we need to decide how we want to configure our project. Choose whether you want to use separate configuration files for each of the features, or to include all configuration setting in the package.json file. I prefer a single file, and have selected the In package.json option.

In the last window, we have the ability to save the whole project creation configuration as an easy to use preset for future projects. I saved mine as spa-simple. Presets are saved in the user folder inside .vuerc file.
When we complete the creation process the project will be created and configured, and the packages that are required will be downloaded and installed.

Exploring the Project Structure
In this section, we’ll explore what Vue CLI has created for us.

In the project folder shown above, we have the following files and folders:
- The node_modules folder contains the packages that the app and development tools require.
- The public folder contains static project assets, which will not be included in the bundling process.
- The src folder contains the Vue.js application with all resources.
- .gitignore contains a list of files and folders that are excluded from the Git version control.
- babel.config.js contains the configuration settings for the Babel compiler.
- package.json contains a list of the packages required for Vue.js development as well as the commands used for the development tools.
- package-lock.json contains a complete list of the packages, required by the project, and their dependencies.
- README.md contains a general information about the project.
The Newly-Created src Folder
Let’s now take a closer look into the src folder:

In the src folder shown above, we have the following files and folders:
- The assets folder is used for static resources required by the app and which will be included in the bundling process.
- The components folder is used for the application’s components.
- The views folder is used for components which will be displayed using the URL routing feature.
- App.vue is the root component.
- main.js is the JavaScript file that create the Vue instance object.
- router.js is used to configure the Vue router.
- store.js is used to configure the data store created with Vuex.
Changing the Project Configuration
The default project configuration contains sensible settings, but if we need, we can change them by adding a file vue.config.js in the project folder, or by adding a vue section to the package.json file. Let’s try the first one: We create a vue.config.js file and put the following option in it:
module.exports = {
  runtimeCompiler: true
}
This will allow components to define their templates as strings, rather than using template elements. To explore the complete set of configuration options you can use visit Vue CLI Config page.
Developing the Project
As we saw above, Vue CLI Service comes with three default scripts: serve, build, and inspect. The first one is used for the development process. We run our project with npm run serve command:

When we open our app in the browser, we should see the following page:

This is the Home.vue page, which uses the HelloWorld.vue component.
The serve command starts a development server, based on webpack-dev-server, with a working Hot Module Replacement (HMR) feature. This means that when we make changes in our components and save them, they will be immediately reflected and the page will be updated in the browser.
Adding New Functionality to the Project With Vue CLI Plugins
At some point of our app development, we may need to add some additional functionality to the project, and for that we’ll need to install Vue CLI plugins. A Vue CLI plugin can modify the webpack configuration and injects new commands to vue-cli-service. To install a plugin, we use the vue add command.
Let’s suppose that we want to use Bootstrap components for our project. Fortunately, there is a bootstrap-vue plugin, which can provide them for us. To install it, we run:
vue add bootstrap-vue
After plugin’s installation, in the src folder, we’ll find a new plugins folder where the new plugin is placed.
Now, to test the plugin’s functionality, let’s modify the About.vue file:
        For more information visit website
      More Info
And when we point to About page in the browser, we should see the page updated and styled with the Bootstrap:

Building the Project for Production
When the app is ready to deploy you need to create a set of bundles containing only the app code and content, along with the modules they depend on, so that these files can be deployed to a production HTTP server.
Building the App
To build our app, we run:
npm run build --modern
The --modern argument creates two versions of the application. One of them is targeted for modern browsers that support the latest JavaScript features, and the other is a fallback for older browsers that need additional libraries to handle those features. The cool thing is that after we deploy the app, the selection of which one version to be used is completely automagical!
Note: When we run build command, Vue CLI allows us to specify an --target option, which allows us to use our code base for different use cases. The default build target is set for building an app. We have two more options to choose from: to build our code as a library or as web components. Check the Build Targets page for more details.
Exploring the dist Folder
When the build process is completed, a dist folder is created in the project root. Let’s explore its contents:

The index.html file will be the entry point for the application. It contains link and script elements that will load all needed CSS and JavaScript files from the css and js folders.
So now, we are ready to deploy our app to a production server. There are plenty of options to choose from. You can learn about many of them by visiting the Deployment page.
Let’s GUI-fy Our Project With Vue UI
Vue CLI 3 is a very powerful, but this comes with a price. There are too many choices, commands, and options to configure and remember. This make it more complex and hard to work with. To bring things back to an easy-and-happy state Guillaume Chau created Vue UI, which significantly simplify the development experience and make it more approachable. At first it may sounds a bit strange to combine a CLI tool with a graphical interface, but as you’ll see later on, this exceptional symbiosis is quite powerful and efficient.
Recreating Our Project With Vue UI
In this section, we’ll go throughout the creation of the same project we created before, but this time we’ll use Vue UI.
Vue UI is made with its own UI framework and no Electron is needed to run it in the browser. Just run the vue ui command, no matter in which directory:
vue ui

Vue Project Manager is launched with the Projects tab selected. There are no existing projects yet. To have some projects listed here, we need either to create them via the UI, or to import projects created with the CLI. Let’s see how we can create a new project.

We switch to Create tab, navigate to desired directory for our app, and click Create a new project here button.

In the next screen, we give a name to the project folder and choose the package manager we prefer.

In the next screen, we are allowed to choose a preset for the project. It can be the default, manual, a remote, or a custom preset we’ve created before. spa-simple is an example of a custom preset. Here, we choose Manual.

In the next screen, we select the plugins we want to install.

Finally, we set the configuration settings for the plugins we have chosen to install. When we are ready, we hit the Create Project button.

Now the project will be created and we will be redirected to the project’s dashboard.

Using the Vue UI Project Dashboard
In the Plugins section all the installed plugins are listed. To install a new plugin, we hit the Add plugin button.

Here, we can search for the plugin we need and when we find it, we hit Install button. In our case, we search and install the bootstrap-vue plugin.

When the plugin is installed, in the Configuration tab, we can set the provided options.

In Files changed tab, we can inspect which files are affected and how. Here, I don’t want to commit any changes, so I hit the Skip button.

In the Dependencies section we have listed all main and development dependencies. To add dependency, we click the Install dependency button.

In the modal window, we can search for main or development dependencies and install them.

In the Configuration section, we can customize the settings provided for the plugins we’ve added. Here, we have settings for Vue CLI itself and for ESLint plugin.

Tasks section give us convenient way to use all available commands provided from Vue CLI and from other plugins. In this screen, the serve task is selected. We can change its parameters by hitting the Parameters button.

In the modal window, we select the parameters we want to run the task with.

When we run the serve task, the dashboard will update with some useful information.

When we switch to the Output tab, we get the logs for the task process.

When we switch to the Analyzer tab, we get a nice graph which summarize information for the whole project.
The build task is almost similar to the serve task with the exception that the former produces a production bundle that can be used to deploy the application.

We can set parameters for the build task in the same way as with the serve task.

The Output field of the inspect task give us information about the resolved webpack configuration.
And that’s it. We successfully recreated our project with the Vue UI. But as we saw the creation and configuration processes are easier and much more pleasant when we use a GUI.
Conclusion
In this tutorial we learned that Vue CLI is a complete system for modern web development. It allows us to operate with the whole Vue ecosystem and 3rd party tools quickly and easily. Of course, we are not required to use Vue CLI for our Vue.js projects. This is completely our choice. But when we aim for speed and quality, Vue CLI is here to help in creating, managing, and deploying our projects in a professional manner.
Powered by WPeMatico


