

If you are a PHP programmer working with the Laravel framework, I am sure that you deploy your web application on cloud servers on providers like Linode, Digital Ocean, Vultr and the rest. That’s because with a framework like Laravel, which works tightly with tools like Git and Composer, it is less and less likely that your application can be served from a shared hosting environment.
This article will show you how to set up your web server for your Laravel application on Linode cloud hosting using the RunCloud.io server management tool.
We will be using Git alongside GitHub’s Webhook feature. When everything is done, we can simply do a commit and a push to GitHub, and your server will be updated with the latest source code. RunCloud makes it easy to set up your server to be able to deploy your application like this, and I’m going to show you how to do that today.
Of course, you can select whichever branch you want the live server to pick up. It can be the master or any other branch that you set, which means that this method of deployment is ideal for incorporating into a.workflow alongside a staging and production environment.
Also, I should mention that this is not limited to GitHub repositories. It will work with GitLab, Bitbucket, and probably any other Git hosting service too, as long as they have the Webhook and Deployment key features.
Also worth a mention is that RunCloud works with any of the cloud hosting providers. Linode was chosen purely as an example of a suitable cloud hosting provider.
Before we get started, I want you to know that you will be installing the Nginx web server, which works best with Laravel. However, RunCloud has the option to install Apache web server as well, in which case you can take advantage of .htaccess configurations.
I am going to skip the part about registration as I am sure you can get around that rather quickly and easily.
If you are ready, let’s get started.
Deploy an Ubuntu 16.04 LTS Server on Linode
When you are logged in to your dashboard on Linode.com, you just have to deploy a new linode (they call their service instance a “linode”). On the bottom right of the dashboard, you should see a link that says Add a Linode.

Next, you select the linode instance that you want and the data center where you want your linode to be deployed, and click the Add this Linode button.

By now, you should have a linode showing the status of Being Created.

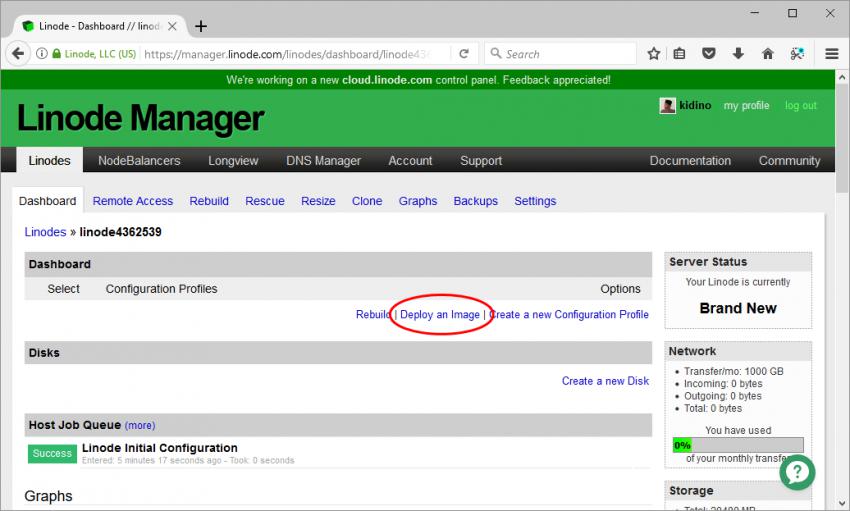
Once this is completed, you will have an empty server. You still need to deploy an image for the operating system for this server. And to make it work with RunCloud later, you need to deploy a fresh Ubuntu 16.04 LTS operating system.
Click on the linode name. In the example above, the name is linode4362539. This will bring you to the next screenshot. Just click on the link that says Deploy an Image.
Here, make sure you select Ubuntu 16.04 LTS as the image. As for the rest, you may choose whatever configuration you feel appropriate. For this 20GB space and 1GB RAM linode, I push my swap disk to the maximum setting, which is 512MB.
Enter your root password and keep this safe. You will need it again later. When you are ready, click on the Deploy button.

Now, click on the Boot button to turn on the server.
You should be able to see that your linode server is not labelled with Running in the right widget box. Let’s try connecting to your server and see if it works. Click on the Remote Access tab.

In the Remote Access tab, you should be able to see some more information about your server, including the IP addresses. Copy this information and keep it safe. We will be needing it again soon.

To connect to your server, you can use any SSH client that you are familiar with. Or if you are like me, and you don’t not want to go away from the browser, you can also use a built-in, web-based SSH client inside Linode. Scroll down and look for a link that says Launch Lish Console.

Clicking on this link will execute Lish, the web-based SSH client. Just enter root as your username and the password you created when deploying the image.

Alright! Your server is ready to be configured with PHP, Nginx, and MariaDB (and other tools). This is where you will be using RunCloud.
If you haven’t already registered a RunCloud account, then you will need to do this now. There is no risk to try RunCloud just for this tutorial, as it will give you a five-day free trial that gives you full access to all the Pro plan features so that you can test them out. Once the five-day period has passed, if you didn’t upgrade, don’t worry—you are only downgraded to their free user level. But at only $10 per month for the Pro plan account, which allows unlimited servers, RunCloud is a pretty cool tool to have in your developer arsenal.
So from RunCloud, we want to connect our Linode and turn it into a working web server on the Internet.
From your Dashboard on RunCloud, click on the button that says Connect a server on the top right.
Connect Your Linode Server to RunCloud and Start Configuring Your Web Server

Enter the required information about your server at Linode. You can go back to your Linode Dashboard to check them out. But the most important part is your IP address. Make sure you have that right. Otherwise, the connection process and installation will fail.
Once you are ready, click on Connect this server.

Now RunCloud will present you with some code that you need to run on your Linode server. Just copy all of that as we will be executing it in the Lish console again after this.

If you still have the Lish window active, you can paste the installation script you copied from the RunCloud dashboard previously.

Paste the installation script code and hit the Enter key. After a short while, when you take a look at the RunCloud dashboard, you will see that RunCloud is displaying a progress bar and notifications displaying installation progress as RunCloud syncs itself with the server. This means a connection has been made.

When the installation is complete, you will be presented with the root password to your MariaDB database. Make sure you keep this safe. There is also a MariaDB user that was created with the username runcloud.

Once everything is complete, you can go back to your RunCloud Dashboard and check your server list. You should have a box with your new server like this.

Your web server may not have started. Click on that server to start managing it. This screenshot below is the main view for managing a server.
Browse the menu on the left and look for Services.

Here, you can turn on both Apache and Nginx. Later, when creating your web application project, you can choose to deploy the PHP version along with the type of web server you want to run: either Apache-Nginx hybrid or native Nginx.
For now, let’s just turn on the required services.

At this point, we should be able to launch a browser and enter the IP address for this server. You should get the default empty website page from RunCloud.

Creating a Web Application (Virtual Host) in Your Server Using RunCloud
Now that your server is all set up and connected to RunCloud, you can just use RunCloud to manage it. When managing a server using SSH, creating a virtual host is always a hassle. Things are a lot easier with RunCloud.
Before you can deploy your Laravel project, you need a place where the app will live. So now you need to create a virtual host on your web server. In RunCloud nomenclature, this is called a ‘Web Application’.
From your RunCloud Dashboard, after selecting your server, find the Web Application menu from the left sidebar.

Now click on the Create Application button.

On the next screen, you will be setting the configurations for your web application.

These are the settings that I chose for it. Of course, you are free to set your own values as you see fit.
Web Application Name    : my-laravel-app
Domain Name : fotofaze.me (just a domain I have available)
User	: runcloud
Public Path	: /public
PHP Version	: 7.1
Web Application Stack	: Native NGINX
Let me explain about the values that are being set.
You can set any name for your web application as a reference to your project. As for the domain name, set a domain name that you will be using for the project. Later, you will be able to set extra domain names for the project. Normally, you would want your website to work with and without the “www” sub-domain. We can add that later.
User refers to the Linux user in your server. You can create more users if you want to assign this project to a specific user. And this particular user will have access to the server via SSH. But I am just using the default runcloud user that was created during server installation.
Public Path is where your public web folder is. By default, a Laravel application will use the “/public” folder for the publicly accessible web folder. All other folders sit outside of this folder. So that is why we set “/public” for this.
I am choosing the latest PHP 7.1 version. And finally, for Web Application Stack, I am selecting the Native NGINX. Another option is the NGINX+Apache2 hybrid, which gives you access to the .htaccess configuration file. But I am going with NGINX all the way for this option.
At this point, your website will still not work with your domain yet. We still need to set it up with the correct DNS. Let’s do that in the next section.
Setting Up the Domain Name, DNS, and SSL
In the previous section, I set fotofaze.me as the domain name. But I also want www.fotofaze.me to work with this web application too. So before we set the DNS, let’s do one more step in RunCloud for this server.
After creating your Web Application, you should see your web application dashboard. From here, click on the Domain Name tab.

We can see that we already have fotofaze.me listed. I still need to add www.fotofaze.me to the list. Just enter the domain name and hit the “Attach Domain Name” button.

I use Namecheap for my domain names. And the great part is that it comes with a built-in DNS server. Otherwise, you may need to use CloudFlare or Linode’s own DNS Service. What we need to do is set two DNS records in the DNS management. One is an A record, and the other is a CNAME.
From my Namecheap Domain Name List, I just click on the Manage button.

From here, I click on the Advanced DNS tab.

Here, no matter what DNS service you are using, we need to set the following DNS records:
Type    : A
Host	: @
Value	: 139.162.5.220 (your server IP address)
Type	: CNAME
Host	: www
Value	: fotofaze.me (your domain name)
This is how my settings look like in Namecheap Advanced DNS.

Give it a while for the DNS changes to resolve before you test your website in the browser. Once the changes are active, you should be getting the NGINX 403 Error when you visit your site. This is because your /public folder is currently empty, but it lets you know everything is working.

One last part when it comes to the domain name is to enable SSL. This allows our website to be accessible using the https:// protocol on port 443 instead of the http:// on port 80. There are many advantages for this. Apart from security purposes, it is also good for SEO.
Let’s go back to the My-Laravel-App Web Application Dashboard and now click on the SSL/TLS tab. SSL certificates used to cost hundreds of dollars. But thanks to Let’s Encrypt, we can now deploy SSL certificates for our domain names for free. It could be very technical if you were to add Let’s Encrypt SSL certificate manually, but with RunCloud, it is a one-click-process piece of cake.

Once here, you can select Let’s Encrypt as your SSL Method. And then click on the Submit button.

Your website should work with the https:// protocol now.
Creating Your Application Database
Because we will be deploying a Laravel app, we will be needing a database. Let’s get that done now. Browse the left sidebar menu and click on the Database menu.

Now click on the Create Database button.

Just enter a name for your database and click on the Add New Database button.

Now we need to add a database user and assign it to our database. Click on the Add User button.

Now just enter a username and a password. And then click the Add button.

Next, we assign the newly created user to the previously created database. Click on the little Attach User icon on your database list.

Since you only have one user at the moment, just make sure that it is selected and then click on the Attach button.

Once done, this is what you will see. The laraveluser is now attached to the laravelapp database.

Now we are just about ready to do some PHP programming with Laravel. But before that, let’s create a GitHub project repository to which we may later push our source code.
Setting Up Your GitHub Project
A solo web developer would normally maintain three places where their source code lives:
- Local computer for development
- Git hosting service (i.e. GitHub) for collaboration, version control, backup, etc.
- The live server
In this part of the tutorial, we’ll create our project repository at GitHub. Later, we will use this repository to push the work from our development environment on our local computer to this specific GitHub project repository.
Over at GitHub, if you are logged in, you can click on the little plus (+) icon on the right side of the top bar. And you should see a menu for New Repository. Click on that.

Just enter the details of your project with something like below. Click on the green button that says Create Repository.

You should have a view like the following now.

The area highlighted with the red box is your project’s repository address on GitHub. We will be needing this later when we are setting up the remote representation of the project from our local development computer.
Now we are ready to start development on our local computer and push the code to GitHub.
Setting Up Your Laravel Project on Your Local Computer
In this part of the tutorial, we will set up our local computer with our development version of our Laravel project. Later, we will upload that to a Git hosting service (we will use GitHub). After that, we will get our Linode server to fetch some code from GitHub so that our production server will always deploy the latest source code.
Just as a side note, this tutorial skips the part about setting up your GitHub account with your public SSH key for secure communication. We will be using the terminal screen quite a lot for SSH. I normally use Putty on Windows.
If you are new to GitHub, you may want to go through the tutorial about generating and setting up your local machine with an SSH key to be used with GitHub.
Managing Git deployment to your live server can easily be set up with RunCloud. Once we have all that set up, with a simple Git push from your local computer, you can always be sure that your server will be fetching those updates automatically. No FTP, no more command-line instructions.
The easiest way to start a Laravel project is to use Composer. If you are unfamiliar with Composer, make sure you read up about it and install it on your local computer. Composer is not just for Laravel. Composer will make managing libraries and dependencies for any PHP project smoother, and its use is considered integral to modern PHP application development.
Open up your preferred terminal tool and run the following command to create a Laravel project.
$ composer create-project --prefer-dist laravel/laravel my-laravel
This may take a while as Composer downloads and installs Laravel on your computer. Composer will create a folder called my-laravel and store everything in there. First, let’s get into this folder.
$ cd my-laravel
About the .env File
To make sure that your Laravel app works properly, you need to set up your database connection settings. You can do that by editing the .env file. Use any text editor that you are familiar with and edit this file. Here’s what a typical .env file would contain. You can update that according to your own needs.
APP_NAME=Laravel
APP_ENV=local
APP_KEY=
APP_DEBUG=true
APP_LOG_LEVEL=debug
APP_URL=http://localhost


DB_CONNECTION=mysql
DB_HOST=127.0.0.1
DB_PORT=3306
DB_DATABASE=homestead
DB_USERNAME=homestead
DB_PASSWORD=secret

...
...
Back to the command-line tool, first let’s create a key for this laravel app. Enter the following command in the terminal. The following command will update the .env file with a key hash.
$ php artisan key:generate
Now let’s initialize it for Git tracking.
$ git init
$ git add --all
$ git commit -m "first commit"
About the Default .gitignore by Laravel
Maybe I should also explain a little about the .gitignore file that comes with Laravel. You can take a look at this file and see which files are not being tracked. For example, .env that stores your database connection details are not being tracked. This means, it is assumed that you will be using different .env files for your local computer and for your live server.
In the previous section, I talked about your remote Git repository address on GitHub. Run the command below with your own address.
$ git remote add origin [email protected]:kidino/my-laravel.git
Next, we will tell our local Git project where is our project location on GitHub. For that, we need to add a remote repository representation.
$ git push -u origin master
If you do it right, your project over at GitHub should have been updated with something like this. If you encounter problems, maybe Git is not set up properly on your computer, or you did not generate your local SSH key.
Check GitHub’s website to help you with that.

Now we can begin setting up auto-deployment using web hooks and triggers. Once we have that, your code will be delivered automatically to your server via RunCloud every time you push your work to GitHub.
Setting Up Git Web Hook in RunCloud
To do this, first we need to generate a deploy key via RunCloud’s panel. From your server panel, in the left menu, you should be able to find a menu labelled Deployment Key.

You should already have one for user runcloud. If you remember, when we created the Web Application, we mentioned that the user is runcloud.

Click on the little eye icon to display the SSH key for this user. If you are getting something like this, that means that an SSH key was never created for this user in the past. Just click OK so that a new SSH key will be created.

Once that’s OK, you will be presented with a layout like this. This is the SSH key that you need to enter in GitHub. With this, GitHub can recognize pull requests when the server wants to pull in new updates. Copy all of it.

Now let’s head over to GitHub.
Go into your project and click on the tab that says Settings. Then click on the Deploy Keys menu in the left sidebar.

Since you might not have a key yet, just click on the Add deploy key button.

Just give it a name and then you can enter your SSH Deploy Key that we got from the RunCloud. Click the Add key button.

Next, we will be setting up a Web Hook trigger. A GitHub web hook works like this—whenever we push new updates to GitHub, we can have GitHub notify other services or servers about that new push. In this case, we will tell GitHub to notify our live server. And this can easily be done via RunCloud.
In RunCloud, open up your Web Application that you created previously. And click on the tab labelled Git.

Scroll down and enter details about your repository at GitHub. This is how it looks like for the project we have been doing in this tutorial. You can set your own branch for live deployment if you don’t want it to be master. But for this example, we will stick with master.
What this means is that when you push your master branch to GitHub, the live server will take that as a sign to update the source code on the server. It will then do a pull of the master branch and update itself.
If you are ready, click on the button labelled Attach Git Repository.

This is the view that you get when you have updated your web application with a Git deployment.

You can see now that you have a Git WebHook URL. This is the URL that we will copy and put into GitHub.
Before we do that, let’s customize our deployment script on our server.
The deployment script is the bash script that you can use to instruct your server to do certain things before or after the GIT pull happens. If you are using Laravel, you will know that Laravel heavily depends on the artisan command and composer to ease your development and deployment.
To change the deployment script, scroll down to the GIT Deployment Script in the GIT tab for the web application. Here, you can add your own script to run. Please make sure to include the git pull somewhere inside your deployment script. You can write the script with Replacer for short-hand usage.

Below is the script that I use.
$ git merge
$ composer dump-autoload -o
$ composer install
$ php artisan migrate --force
$ php artisan clear-compiled
$ php artisan view:clear
$ php artisan config:clear
$ php artisan optimize
$ composer dump-autoload -o
$ php artisan queue:restart
You can use this same script. Check the checkbox and click on the Save button.
Now go back up. We still need to put our Git Webhook URL into GitHub.

Copy this URL, and then we will proceed to GitHub. In GitHub, proceed to your project repository. Then click on the Settings tab. Then on the Webhooks menu from the sidebar. And then on the Add Webhook button.

Just paste the Git WebHook URL we got from RunCloud into the Payload URL text field. Make sure you select application/json for Content type. That should be good enough. Then click on the Add Webhook button.

By now, we should be able to do a Git push from our local machine, and the live server will be updated automatically. But there is still one thing that we need to do.
If you remember, I wrote about the .gitignore and the .env file. Because we included the .env file in our .gitignore file, our Laravel app on the server is missing the requisite .env file. We need to create that to remedy the situation.
We can use SSH and the terminal. Alternatively, we can also use the File Manager inside RunCloud. Let’s assume that you use the SSH like Putty or any other terminal tool. If you remember, previously this web application was created using the runcloud user. Make sure you connect via SSH using that user too.
You need to browse to your web application folder. And then run the following command.
$ cd /home/runcloud/webapps/my-laravel-app
$ cp .example.env .env
$ php artisan key:generate
Don’t forget to update your .env file.
Now you should have the .env file, with the hash key generated. You still need to update this file and update it with your database connection settings, just like you created them in previous steps.
Let’s Try a Git Push
The only thing to do now is to do an update on the local machine and push it to GitHub.
I did a simple edit on the welcome.blade.php file in the resources/views folder.

Let’s do a commit and then push it to the server.
$ git add --all
$ git commit -m "updating welcome.blade.php"
$ git push origin master
If everything goes as planned, you can launch the website in the browser and see the changes you just made. Congratulations—you just updated your server without having to resort to an S/FTP upload.

Powered by WPeMatico


