

Lambda expressions can help you remove boilerplate code from your projects and process huge amounts of data with ease. See how with this in-depth look at the Java 8 features you can start using in your Android projects today.
Java 8 for Android
Java 8, which debuted way back in March 2014, was a big step forward for the programming language, introducing a list of features that promised to make coding in Java easier and more concise than ever before.
Unfortunately, Android developers wouldn’t feel the benefits of these features for a while, as Google experimented with bringing Java 8 to the Android platform via Jack (Java Android Compiler Kit) before deprecating Jack in favour of supporting Java 8 natively in Android Studio.
Now, with the release of Android Studio 3.0, we finally have a version of the Android toolchain that has built-in support for some of Java 8’s most important features.
In this series, I’m going to show you how to remove a ton of boilerplate code from your projects, process huge amounts of data with ease, and even embrace a more functional style in your Java programing with Java 8. We’ll be taking an in-depth look at the Java 8 features that you can start using today.
By the time you’ve completed this series, you’ll be ready to use all of the following Java 8 features in your Android projects:
- lambda expressions
- method references
- default methods
- static interface methods
- type annotations
- repeating annotations
- functional interfaces
- the Stream API
In this first post, we’re going to look at the feature that generated the most buzz when Java 8 was first released, and that has the potential to make the most difference to Android developers: lambda expressions.
Preparing Your Development Environment
Before you can start using any Java 8 features, you need to make sure that your development environment is set up to support this version of Java.
If you don’t already have Java 8 installed, then you’ll need to download the latest JDK8 and update Android Studio’s JDK path so that it’s pointing at the JDK8 package:
- Launch Android Studio.
- Select File > Project Structure… from the Android Studio toolbar.
- Update the JDK Location field so that it’s pointing at your newly downloaded JDK8 package.
If you’re not sure what version of Java you have installed, then you can check by opening a Terminal window (if you’re a Mac user), or a Command Prompt (if you’re on Windows) and then running the following command:
java -version
If it returns build 1.8 or higher, then you’re good to go!
You’ll also need to have Android Studio 3.0 Preview 1 or higher installed, although to reduce your chances of encountering bugs and other strange behaviour, it’s recommended that you install the latest version of Android Studio 3.0—whether that’s a beta or preview or, ideally, a stable version of Android Studio 3.0 (which wasn’t yet available at the time of writing).
Next, you’ll need to make some changes to your project’s build.gradle files. Usually, you’ll just need to add a few lines of code specifying that this project should generate Java 8 bytecode. However, if you’ve previously experimented with Java 8 features using the Jack compiler or the popular Retrolambda project, then you’ll need to disable these tools before your project can use the new-and-improved Java 8 support provided by Android’s default toolchain.
In the following sections, I’ll show you how to enable Java 8 support, and how to disable Retrolambda and Jack, if required.
Adding Java 8 Support to a New Project
Assuming that you haven’t previously enabled Jack or added Retrolambda as a project dependency, the first step is opening your project-level build.gradle file and making sure that you’re using version 3.0.0-alpha1 (or higher) of the Gradle for Android plugin:
buildscript {

  repositories {
      google()
      jcenter()
  }

  dependencies {
      classpath 'com.android.tools.build:gradle:3.0.0-alpha6'
Next, open every module-level build.gradle file where you want to use Java 8 features, and set the language level of the source code and the version of the generated Java bytecode to JavaVersion.VERSION_1_8:
android {
  compileSdkVersion 26
  buildToolsVersion "26.0.1"
  defaultConfig {

      applicationId "com.jessicathornsby.myapplication"
      minSdkVersion 26
      targetSdkVersion 26
      versionCode 1
      versionName "1.0"
      testInstrumentationRunner "android.support.test.runner.AndroidJUnitRunner"

//Add the following block//

      compileOptions {
          sourceCompatibility JavaVersion.VERSION_1_8
          targetCompatibility JavaVersion.VERSION_1_8
      }
  }
If You’re Migrating From Jack
The Jack compiler may be deprecated, but as long as it’s enabled, your project is going to use the Java 8 support provided by Jack, rather than the support provided by Android’s default toolchain.
Using a deprecated tool is never a good idea, but there are some additional reasons why you should migrate from the Jack compiler, if you haven’t already.
Firstly, Jack may support a subset of Java 8 features, but unlike the default toolchain it doesn’t support third-party libraries that use these features, so by using Jack you’re immediately limiting your options when it comes to third-party libraries.
Secondly, the Jack compiler takes Java code and converts it directly into dex, without producing any intermediate bytecode. As long as Jack is enabled, you’ll be unable to use any of the tools that rely on this intermediate output, such as annotation processors and bytecode analyzers.
To disable the Jack compiler, open your module-level build.gradle file and remove the jackOptions section, but make sure you leave the compileOptions block intact:
android {

  compileSdkVersion 26
  buildToolsVersion "26.0.1"
  defaultConfig {

      applicationId "com.jessicathornsby.myapplication"
      minSdkVersion 26
      targetSdkVersion 26
      versionCode 1
      versionName "1.0"

//Remove the entire jackOptions section//

      jackOptions {
          enabled true
      }

      testInstrumentationRunner "android.support.test.runner.AndroidJUnitRunner"

//Don’t remove the compileOptions section//

      compileOptions {
          sourceCompatibility JavaVersion.VERSION_1_8
          targetCompatibility JavaVersion.VERSION_1_8

      }
  }
If You’re Migrating From Retrolambda
Similar to Jack, Retrolambda doesn’t support third-party libraries that use Java 8 language features. If your project is set up to use the Retrolambda plugin, then you should remove this plugin so that your project can revert to the default toolchain.
Open your project-level build.gradle file and remove Retrolambda as a project dependency:
  dependencies {
      classpath 'com.android.tools.build:gradle:3.0.0-beta2'

//Remove the following line//

      classpath 'me.tatarka:gradle-retrolambda:3.7.0'
Then, remove the Retrolambda plugin from each of your module-level build.gradle files:
apply plugin: 'com.android.application'

//Remove the following line//

apply plugin: 'me.tatarka.retrolambda'

android {
...
...
...

//Don’t delete the compileOptions block!//

compileOptions {
      sourceCompatibility JavaVersion.VERSION_1_8
      targetCompatibility JavaVersion.VERSION_1_8

  }
}
Test Your Java 8 Support
The easiest way of verifying that your project can now support Java 8 is to write a quick lambda expression and see whether your project still compiles.
Add a button to your user interface (or use a button that already exists) and then implement an onClickListener for this button, using a lambda expression. Don’t worry if the following code doesn’t make much sense now—it will by the end of this article!
import android.support.v7.app.AppCompatActivity;
import android.os.Bundle;
import android.widget.Button;
import android.view.View;
import android.widget.Toast;

public class MainActivity extends AppCompatActivity {

  @Override
  protected void onCreate(Bundle savedInstanceState) {
      super.onCreate(savedInstanceState);
      setContentView(R.layout.activity_main);

//Implement the onClickListener using a lambda expression//

      Button button = (Button) findViewById(R.id.button);
      if (button != null) {
          button.setOnClickListener((View view) -> Toast.makeText(this,
                  "I was written in Java 8!", Toast.LENGTH_LONG).show());

      }
  }
}
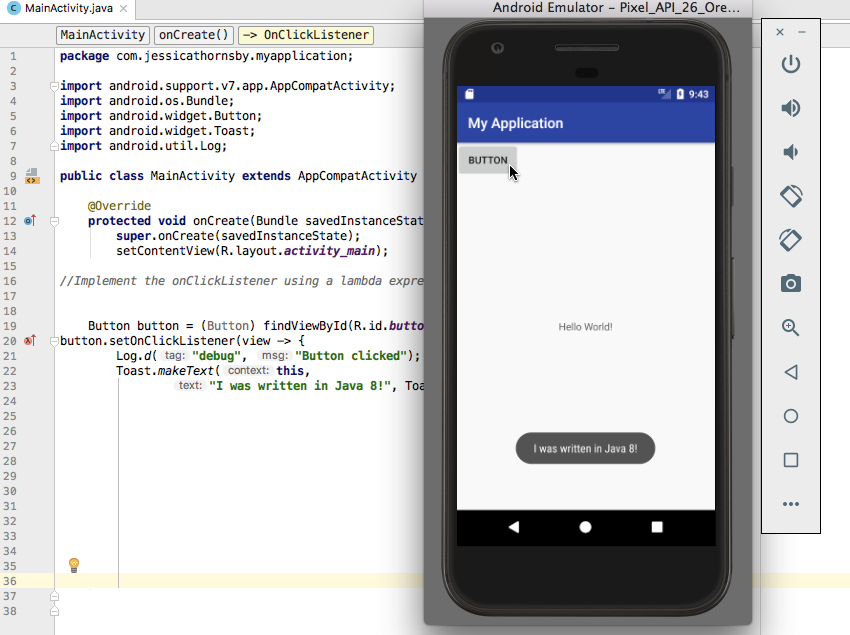
Check that your project still compiles, either by selecting Sync from the banner that appears, or by selecting Tools > Android > Sync Project with Gradle Files from the Android Studio toolbar.
If Android Studio doesn’t throw any errors, then you’re ready to start using all the features we listed at the start of this article, including lambda expressions!
Why Are Lambda Expressions So Important?
Lambda expressions were easily Java 8’s biggest new feature, and can have a huge impact on the amount of boilerplate code you need to write when creating pretty much any Android app.
Essentially, a lambda expression represents a function that doesn’t belong to any class, and that you can pass around with ease and then execute on demand.
This feature removes a long-standing frustration many Android developers have experienced with Java: as an object-oriented language, passing around blocks of code has always felt more difficult than it should be. For example, if you wanted to create a new thread and then pass some code to that thread, then you’d typically have to instantiate a thread with an anonymous implementation of the Runnable interface—that’s a lot of work just to pass some code! By providing an easy way of passing a function to a method, lambda expressions have the potential to simplify some of the most common tasks that you’ll perform as an Android developer.
Lambda expressions will also be a welcome addition for any Java developers who want to take a more functional approach to their programming. Prior to Java 8, coding in a functional style would inevitably require you to write lots of boilerplate code, but now that you can pass functions around using lambda expressions, writing your Java code in a less object-oriented way doesn’t have to involve writing a ton of anonymous classes.
How Do I Create a Lambda Expression?
You create a lambda expression using the following syntax:
(argument) -> {expression body}
The arrow operator is pretty self-explanatory, but the rules for how you should structure the lambda’s argument and expression can vary depending on what you’re trying to achieve, so let’s explore these two elements in more detail.
The Argument
The argument is one or more parameters, which are almost always enclosed in parentheses. Even if your lambda expression doesn’t have any parameters, you’ll still need to supply empty parentheses, for example:
() -> System.out.println("This lambda expression has no parameters");
The exception to this rule is when your method has a single parameter with its type inferred, in which case you can omit the parentheses:
textView.setOnLongClickListener(event -> System.out.println("Long Click"));
You can use multiple parameters in your argument, by separating each parameter with a comma:
(parameter1, parameter2) -> System.out.println("Parameters: " + parameter1 + ", " + parameter2);
Type inference is possible in lambdas, so you can generally omit the data type from your argument. However, if the compiler cannot infer the data type, then you’ll need to add the type in front of your parameter(s):
  Button button = (Button) findViewById(R.id.button);
  if (button != null) {
      button.setOnClickListener((View view) -> Log.d("debug", "Button clicked"));

  }
}
The Expression Body
The expression body is the code that you want to execute, which can be a single expression or multiple lines of code. If you want to execute multiple lines, then you’ll need to create a statement block by surrounding this section of your code with curly braces:
Button button = (Button) findViewById(R.id.button);
button.setOnClickListener(view -> {
  Log.d("debug", "Button clicked");
  Toast.makeText(this,
          "I was written in Java 8!", Toast.LENGTH_LONG).show();
If your expression returns a value, then it must be returned with a return statement, for example:
(parameter1) -> {
   System.out.println("Parameter: " + parameter1);
   return "return value";
 }
Using Lambda Expressions in Your Android Apps
Now we have an overview of the various ways that you can structure a lambda expression, let’s take a look at some of the most common scenarios where you can use lambda expressions in your Android development work.
Lambdas for Event Handling
Your typical Android app has to be able to respond to a wide range of user input events, and lambda expressions can make this event handling much more straightforward.
In the following code, we’re using an anonymous class to create an instance of onClickListener with an overridden onClick method. Chances are, you’ve written this kind of code countless times.
Button button = (Button)findViewById(R.id.button);
button.setOnClickListener(new View.OnClickListener() {
   @Override
   public void onClick(View view) {
       doSomething();
   }
});
By rewriting the above code with a lambda expression, we can remove all of the following:
- the class instantiation:
new View.OnClickListener() - the access modifier, method name, and type:
public void onClick(View view) - and the parameter types, so you don’t have to write
View view
This means that we can implement exactly the same functionality, using a single line:
button.setOnClickListener(view -> doSomething());
Lambdas for Multithreading
Multithreading is another common scenario where lambda expressions can help you write cleaner code. By default, Android has a single UI (user interface) thread that’s responsible for handling all user interaction, dispatching events to the appropriate UI widgets, and modifying the user interface. As soon as you block this UI thread with any long-running or intensive operations, your application is going to become unresponsive, and may even trigger Android’s ANR (Application Not Responding) dialog. So creating additional threads and assigning code to run on those threads is often an essential part of Android development.
Prior to Java 8, assigning code to run on an additional thread required you to create an anonymous class that implements the Runnable interface:
Runnable r = new Runnable(){
   @Override
   public void run(){
       System.out.println("My runnable");

   }
};

Thread thread = new Thread(r);
thread.start();
Alternatively, you could instantiate a new thread with an anonymous implementation of the Runnable interface:
Thread thread = new Thread(new Runnable() {
   @Override
   public void run(){
       System.out.println("My runnable");

   }
});

thread.start();
Replacing this anonymous class with a lambda expression can make this frequently performed task much more concise:
Runnable r = () -> { System.out.println("My runnable"); };

//Start the new thread//

new Thread(r).start();
Finally, if you’re using the RxJava or RxAndroid library, then you can use lambda expressions to help you create observables.
Here, we’re creating a simple Observable that emits the hello world string to all of its Observers:
Observable.just("Hello, world!")
   .subscribe(new Action1() {
       @Override
       public void call(String s) {
           Log.d(TAG, s);
       }
   });
Using a lambda expression allows you to replace all of that Action1 code with a single line:
Observable.just("Hello, world!")
   .subscribe(s -> Log.d(TAG, s));
Using Lambda Expressions in Your Real-Life Code
After reading all the theory behind a new feature, the next challenge is getting into the habit of actually using this new feature. This can be particularly tough with something like lambdas, which are designed to be used instead of familiar boilerplate code, as there’s always the temptation to simply fall back on what you know.
Android Studio has a few features that can help give you that final push to replace familiar-but-clunky code with shiny new lambda expressions.
The first feature is Android Studio’s intent actions menu, which can auto-convert any compatible anonymous class into the equivalent lambda expression. This is perfect if you’re ever unsure about how to write a particular piece of code in a lambda format: simply write it as usual, and then use the intent action menu’s auto-convert feature.
To auto-convert an anonymous class into a lambda expression:
- Hover your cursor over the anonymous class, and Android Studio should display a tooltip informing you that it can convert this section of code into a lambda expression.
- Press your Mac’s Alt/Option-Enter keys, or use the Alt-Enter shortcut if you’re a Windows or Linux user.
- Select the Replace with lambda option from the context menu.

Alternatively, you can use Android Studio’s Inspection tool to flag every anonymous class that you could potentially replace with a lambda expression, across your entire project. You can then either rewrite each anonymous class manually or let Android Studio’s auto-convert feature show you how it’s done.
To highlight every anonymous class that Android Studio could potentially replace with a lambda expression:
- Select Analyze > Run Inspection by Name from the Android Studio toolbar.
- In the popup that appears, start typing Anonymous type can be replaced with lambda, and then select this option when it appears in the dropdown menu.

- In the subsequent window, select Whole project to flag every anonymous class across your project. Alternatively, you can specify individual modules or files where Android Studio should run this inspection.
- Click OK.
- Select Analyze > Inspect Code from the Android Studio toolbar.
The Inspection Results pane should now appear and display a list of all the anonymous classes that you can replace with a lambda expression. To take a closer look at an anonymous class, simply double-click that class in the Inspection Results window, and Android Studio will open the file and take you to the exact line that contains this particular anonymous class.
To replace the currently selected anonymous class with a lambda expression, give the Replace with lambda button a click.

If Android Studio doesn’t open the Inspection Results window automatically, then you can launch it manually by selecting View > Tool Windows > Inspection Results from the Android Studio toolbar. If Inspection Results doesn’t appear in the Tool Windows sub-menu, then you may need to select Analyze > Inspect Code… from the Android Studio toolbar first.
Testing Lambda Expressions
Despite the many benefits that lambda expressions have to offer, there’s one major drawback that you should be aware of before adding them to your code. Since lambdas don’t have a name, you can’t call them directly from your test code, so adding a large number of lambdas to your project can make it more difficult to test.
Ideally, your lambda expressions should be too simple to break, so being unable to unit test them shouldn’t be too big of an issue. However, if you do need to test a lambda, then you can always treat it like a private method and unit test the outcome, rather than the lambda itself. Alternatively, you could refactor the lambda expression into its own method, so you can reference it directly and therefore test it as normal.
Conclusion
In this first post on Java 8 language features, we looked at how to set up your Android projects to support Java 8, and how to cut down on boilerplate code by replacing anonymous classes with lambda expressions.
In the next post, I’ll be showing you how to trim even more code from your Android projects by combining lambda expressions with method references, and how you can enhance your interfaces with default and static interface methods.
In the meantime, check out some of our other posts about Android app development!
 Android SDKIntroduction to Android Architecture Components
 Android SDKWhat Are Android Instant Apps?
 Android SDKJava vs. Kotlin: Should You Be Using Kotlin for Android Development?
 Android SDKSending Data With Retrofit 2 HTTP Client for Android
Powered by WPeMatico


