


The material design team at Google gives a clear definition of what settings in your Android app should do:
App settings let users indicate preferences for how an app should behave.
They at Google also state that your users should navigate to the app settings either from the side navigation or toolbar menu—with an item labeled Settings.
Including settings in your app gives your users the power to control some of the functionality of your app. This makes your users happy instead of angry—because they are now in control of how the app behaves.
It’s highly recommended to give access to app settings. This will provide a better user experience for your users, which leads to a better review on the Google Play store, which then eventually gives rise to a higher number of app downloads (which boost revenue).
I assume you must have interacted with an app’s settings on your device, for example by selecting a default ringtone, or by controlling your privacy on the app. Almost all of the most popular apps you’ve downloaded or will download on the Google Play store include a settings screen for you to control the behaviour of the application.
An example of a popular app that has a settings screen is the Chrome Android app from Google. In this app’s settings screen, users can choose the default search engine, change the notification behaviour, control user privacy, etc. You can see this yourself by downloading the Chrome app from the Google Play store (if you don’t already have it on your device). The following screenshot is from the Chrome app, displaying the app’s settings screen.

In this post, you’ll learn how to create an app settings screen from scratch and also how to read the values the user has selected from the app settings. For an additional bonus, you’ll also learn how to use the Android Studio templates feature to quickly bootstrap your project with a settings screen.
A sample project (in Kotlin) for this tutorial can be found on our GitHub repo so you can easily follow along.
Prerequisites
To be able to follow this tutorial, you’ll need:
- A basic understanding of some Android APIs (such as
SharedPreferences) - Android Studio 3.0 or higher
- Kotlin plugin 1.1.51 or higher
1. Create an Android Studio Project
Fire up Android Studio and create a new project (you can name it SettingsScreenDemo) with an empty activity called SettingsActivity. Make sure to also check the Include Kotlin support check box.

2. Creating a PreferenceFragment
To support API Level 11 (Honeycomb) and above, we can use the PreferenceFragment. This class is simply a Fragment that shows a hierarchy of Preference objects as lists.
import android.os.Bundle
import android.preference.PreferenceFragment
import android.support.v7.app.AppCompatActivity

class SettingsActivity : AppCompatActivity() {

    override fun onCreate(savedInstanceState: Bundle?) {
        super.onCreate(savedInstanceState)

        if (fragmentManager.findFragmentById(android.R.id.content) == null) {
            fragmentManager.beginTransaction()
                    .add(android.R.id.content, SettingsFragment()).commit()
        }
    }


    class SettingsFragment : PreferenceFragment() {
        override fun onCreate(savedInstanceState: Bundle?) {
            super.onCreate(savedInstanceState)
            addPreferencesFromResource(R.xml.preferences)
        }
    }
}
In the code above, we created a nested class SettingsFragment inside SettingsActivity (because the SetttingsFragment class is so small). Note that our class SettingsFragment extends the PreferenceFragment superclass and has a method addPrerenceFromResource inside onCreate(). In this method, we gave it a resource ID R.xml.preference of the preference XML to launch—when the Fragment is loaded. Finally, we host the Fragment to the activity by simply using the FragmentTransaction to add it to the UI—inside onCreate() of SettingsActivity.
3. Creating Our Preferences
Create an XML file and name it preferences.xml. Save this file inside the res/xml directory in your app project. Note that you can give this file any name, but it’s highly recommended to stick with the conventional name “preferences”. Also, you typically should have only one such file in an app project.
The root node for our preferences.xml file should be a Preference. Here are the common attributes associated with a Preference:
-
android:key: this attribute is used to get the value in theSharedPreferencesobject. -
android:title: sets the title for thePreference. This is the bold text. -
android:summary: sets the summary for thePreference(this is not required). This is the faded text below the title. -
android:defaultValue: sets the default value for thePreference.
We’ll go through each Preference we’ve defined above shortly. Note that you can also add or customize a Preference via the Android Studio preference editor—similar to the layout resource editor you’re already familiar with. You can either choose to add/edit your preference XML file directly in “Text” mode or use the drag-and-drop UI in “Design” mode.

As you can see, in this editor, you can drag and drop any Preference in the palette section (on the left side). Once dropped, you should select it and modify its attributes on the attributes pane (on the right side) of the editor. Note that by default, we’re given a few attributes to modify. To view or modify all the attributes associated with a selected Preference, make sure you click the View all attributes link at the bottom of the attributes pane. This is very similar to the layout editor you already know.
Now, let’s go through each of the Preference entities we have.
Checkbox Preference
A CheckBoxPreference is simply a CheckBox widget that’s included in the preference screen. This Preference returns the value “true” if checked or “false” otherwise. In other words, it returns a boolean depending on the state of the widget.

Other attributes you can add to a CheckBoxPreference are:
-
android:summaryOff: sets the summary for thePreferencein a preference screen when it’s unchecked. -
android:summaryOn: sets the summary for thePreferencein a preference screen when it’s checked. -
android:disableDependentsState: The state (true for on, or false for off) that causes dependents to be disabled. May be a boolean value, such as “true” or “false”.
Switch Preference
SwitchPreference performs similar functionality to the CheckBoxPreference. It provides a two-state (“on” or “off”) toggleable option. This uses a Switch widget that allows the user to slide left (“off”) and right (“on”). This Preference also includes the attributes described for the CheckBoxPreference above. In addition, it has the following attributes:
-
android:switchTextOff: sets the text used on the switch itself when in the “off” state. -
android:switchTextOn: sets the text used on the switch itself when in the “on” state.

EditText Preference
This Preference, when clicked, shows a dialog for the user to enter an input text. It uses the EditText widget—including all the attributes of that widget that you’re already familiar with.
Note that the value stored in the SharedPreferences is a string.

List Preference
This kind of Preference will display a list of entries in a dialog when tapped. Here, you can specify a pair of string-array resources in your preference XML. This string-array resource simply contains a collection of strings. This resource is located at res/values/arrays.xml.
- 15 minutes
- 30 minutes
- 1 hour
- 3 hours
- 6 hours
- Never
- 15
- 30
- 60
- 180
- 360
- -1
Here is our sample ListPreference using this resource.
We set the entries and entry values using the android:entries and android:entryValues attributes respectively.
-
android:entries: the human-readable array to present as a list. -
android:entryValues: the array to find the value to save for a preference when an entry from entries is selected.

For example, if we use the number of minutes in each duration as the entry values, when the user picks a time duration (e.g. 30 minutes), the corresponding integer value will be stored in SharedPreferences (e.g. 30).
MultiSelect List Preference
This one is similar to ListPreference but instead of having radio buttons, we have check boxes. In other words, the user can select multiple items in the dialog. Note that the result is stored in a “string set” in the SharedPreferences. This can be retrieved using getStringSet().
Ringtone Preference
When a RingtonePreference is tapped, a dialog is shown containing the list of available ringtones on the device or emulator.
-
android:showDefault: whether the Default ringtone option will be shown. -
android:showSilent: whether a Silent option will be shown in the list. The user can select this option if they don’t want to play any ringtone.

Note that the value stored in the SharedPreferences for this preference is a special string. This special string is a URI which points to a ContentProvider.
4. Creating Setting Groups
It becomes a problem when you have a long list of preferences or settings, because users may have some trouble scanning or understanding them. To solve this problem, we can group our preferences. Take a look at the screenshot of the Chrome app I showed you in the beginning again—notice it grouped the preferences into two categories: Basics and Advanced. This makes it easier for the user to understand the preferences and to not make the list seem too overwhelming.
Let’s now look at how simple it is to perform this task.
        ...


        ...
We simply surround the preferences we want to group in a android:title attribute.

5. Starting an Intent
Note that’s it’s possible to open an activity by just clicking a preference item from the settings screen. This can come in handy when you want to open a web page. Here’s the code to do that:
Here, we added a
-
android:action: sets the action for the Intent (this is similar to callingsetAction()on an Intent object). -
android:targetClass: sets the class part of the component name (same as callingsetComponent()on an Intent object). -
android:targetPackage: sets the package part of the component name. -
android:data: sets the data to assign (same as callingsetData()on an Intent object).
To open a web page, for example, you could use the following:
6. Binding the Preference Summary to the Value Selected
Let’s now see how to update the preference summary with the value selected by the user.
class SettingsActivity : AppCompatActivity() {

    // ...
    class SettingsFragment : PreferenceFragment() {
        override fun onCreate(savedInstanceState: Bundle?) {
            super.onCreate(savedInstanceState)
            addPreferencesFromResource(R.xml.preferences)

            bindPreferenceSummaryToValue(findPreference("ringtone"))
            bindPreferenceSummaryToValue(findPreference("text"))
            bindPreferenceSummaryToValue(findPreference("list"))
        }
    }
    // ...
}
In this class, we created a helper method called bindPreferenceSummaryToValue(), which is inside our companion object, to update the preference summary text with the value the user has selected. We passed it a Preference object as an argument. The findPreference() will return a Preference using the Preference‘s key.
class SettingsActivity : AppCompatActivity() {
    // ...
    companion object {

        /**
         * A preference value change listener that updates the preference's summary
         * to reflect its new value.
         */
        private val sBindPreferenceSummaryToValueListener = Preference.OnPreferenceChangeListener { preference, value ->

            val stringValue = value.toString()

            if (preference is ListPreference) {
                // For list preferences, look up the correct display value in
                // the preference's 'entries' list.
                val listPreference = preference
                val index = listPreference.findIndexOfValue(stringValue)

                // Set the summary to reflect the new value.
                preference.setSummary(
                        if (index >= 0)
                            listPreference.entries[index]
                        else
                            null)

            } else if (preference is RingtonePreference) {
                // For ringtone preferences, look up the correct display value
                // using RingtoneManager.
                if (TextUtils.isEmpty(stringValue)) {
                    // Empty values correspond to 'silent' (no ringtone).
                    preference.setSummary("Silent")

                } else {
                    val ringtone = RingtoneManager.getRingtone(
                            preference.getContext(), Uri.parse(stringValue))

                    if (ringtone == null) {
                        // Clear the summary if there was a lookup error.
                        preference.setSummary(null)
                    } else {
                        // Set the summary to reflect the new ringtone display
                        // name.
                        val name = ringtone.getTitle(preference.getContext())
                        preference.setSummary(name)
                    }
                }
            }
            else {
                // For all other preferences, set the summary to the value's
                // simple string representation.
                preference.summary = stringValue
            }
            true
        }

        private fun bindPreferenceSummaryToValue(preference: Preference) {
            // Set the listener to watch for value changes.
            preference.onPreferenceChangeListener = sBindPreferenceSummaryToValueListener

            // Trigger the listener immediately with the preference's
            // current value.
            sBindPreferenceSummaryToValueListener.onPreferenceChange(preference,
                    PreferenceManager
                            .getDefaultSharedPreferences(preference.context)
                            .getString(preference.key, ""))
        }
    }
}
We have a variable sBindPreferenceSummaryToValueListener that is an instance of Preference.OnPreferenceChangeListener. This is simply a preference change listener that will help us update the preference summary to the value the user has selected. We check for special cases, like when the selected preference is a RingtonePreference or a ListPreference. For those preference types, we do some special handling to get the summary string. If the preference is neither (like an EditTextPreference), we just set the summary to the preference’s string value.
Inside the bindPreferenceSummaryToValue(), we set the preference change listener by calling onPreferenceChangeListener (in Java, it’s setOnPreferenceChangeListener instead) on the Preference object.
Now run the project again to see how it all works!

7. Retrieving Preference Values
To start getting preference values for the settings screen, we call getDefaultSharedPreference() which is inside the PreferenceManager class—passing it a Context object of the preferences whose values are wanted. Note that we get the values from the default SharedPreferences for our application.
val prefs = PreferenceManager.getDefaultSharedPreferences(this)
prefs.getBoolean("checkbox", false).toString()
prefs.getString("ringtone", "")
prefs.getString("text", "")
prefs.getString("list", "")
You call the corresponding getter method for the type we want to retrieve the value from in SharedPreferences. You pass it the key as the first argument, and the default value is the second argument.
8. Bonus: Using Android Studio Templates
Now that you have learnt about the APIs involved to create a settings screen from scratch in Android, I’ll show you a shortcut that will make it quicker next time. You can choose to use a template instead of coding a settings screen from scratch.
Android Studio provides code templates that follow the Android design and development best practices. These existing code templates (available in Java and Kotlin) can help you quickly kick-start your project. One such template can be used to create a settings screen.
To use this handy feature for a new project, first fire up Android Studio.

Enter the application name and click the Next button. You can leave the defaults as they are in the Target Android Devices dialog.
Click the Next button again.
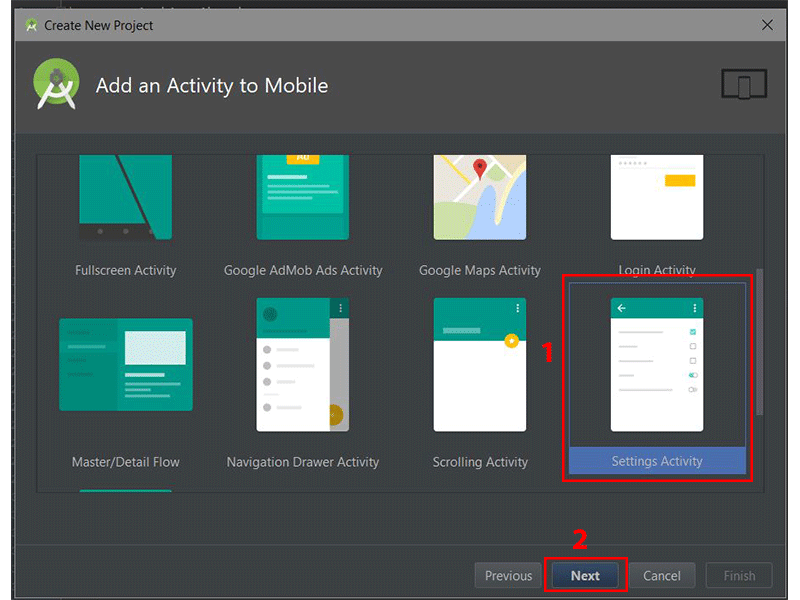
In the Add an Activity to Mobile dialog, scroll down and select Settings Activity. Click the Next button after that.

In the last dialog, you can rename the Activity name, layout name or title if you want. Finally, click the Finish button to accept all configurations.
Android Studio has now helped us to create a project with a settings activity. Really cool! You are strongly advised to explore the code generated.
You can use templates for an already existing Android Studio project too. Simply go to File > New > Activity > Settings Activity.

Note that the templates that come included with Android Studio are good for simple layouts and making basic apps, but if you want to really kick-start your app, you might consider some of the app templates available from Envato Market.
They’re a huge time saver for experienced developers, helping them to cut through the slog of creating an app from scratch and focus their talents instead on the unique and customised parts of creating a new app
Conclusion
In this tutorial, you learned how to create app settings in Android from scratch. We also explored how to easily and quickly use the Android Studio templates to create app settings.
I highly recommend checking out the official material design guidelines for settings to learn more about how to properly design and use settings in Android. Also, check out the official API guide to learn more about other APIs for creating a settings activity.
To learn more about coding for Android, check out some of our other courses and tutorials here on Envato Tuts+!
 Android SDKShowing Material Design Dialogs in an Android App
 Android SDKSending Data With Retrofit 2 HTTP Client for Android
 App Templates15 Best Android App Templates of 2017
 Android SDKHow to Create an Android Chat App Using Firebase
Powered by WPeMatico


