In this series of tips, we’ve been taking a closer look at some of the new Android features and tools announced at this year’s Google I/O, that you can get your hands on today.
In this post, we’re going to get some hands-on experience with the major new features coming up in Android Studio 3, by exploring the Android Studio 3.0 Preview.
If you haven’t already, you can download the Preview from the official Android website. Just note that this is an early access release, so it’s not recommended to use it for your day-to-day development work.
Built-In Support for Kotlin
One of the most exciting Android announcements from this year’s Google I/O keynote is that Google is making Kotlin a first-class language for Android development.
Although you could previously add Kotlin support to Android Studio via a plugin, Android Studio 3.0 will have Kotlin support built in, making it even easier to start using Kotlin for Android development.
There are three ways that you can start using Kotlin in the Android Studio 3.0 Preview:
Start a New Project With Kotlin
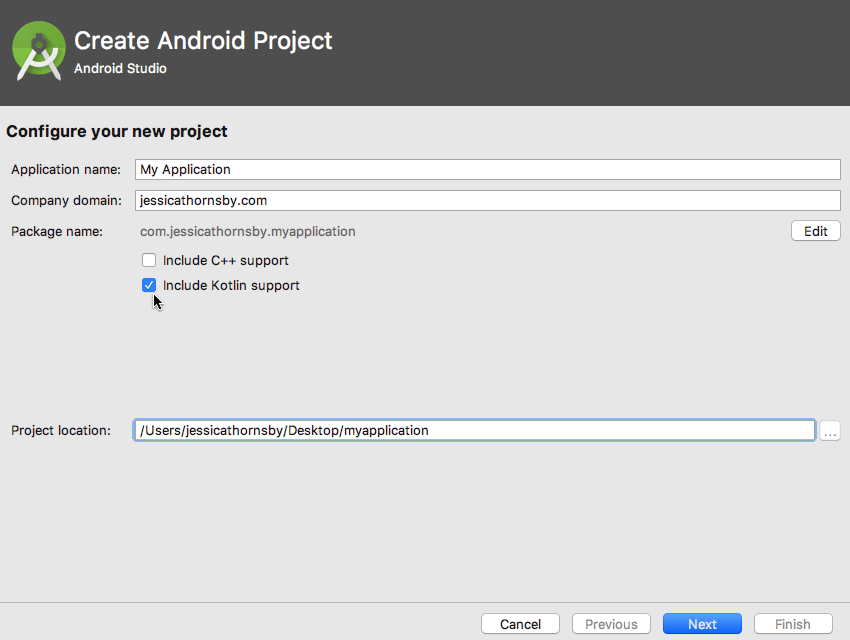
First, if you’re creating a new project then the project creation wizard now features an Include Kotlin Support checkbox.

When you select this option, Android Studio generates all the code your project needs to support Kotlin. If you open your project-level build.gradle file, you’ll see that the version of Kotlin you’re using has been added to the buildscript section:
buildscript {
  ext.kotlin_version = '1.1.2-4'
  repositories {
      maven { url 'https://maven.google.com' }
      jcenter()
  }
And if you open your module-level build.gradle file, you’ll notice that some Kotlin-specific lines have been added here, too:
apply plugin: 'com.android.application'
apply plugin: 'kotlin-android'
...
...
...
dependencies {
  compile fileTree(dir: 'libs', include: ['*.jar'])
  androidTestCompile('com.android.support.test.espresso:espresso-core:2.2.2', {
      exclude group: 'com.android.support', module: 'support-annotations'

  })

  compile "org.jetbrains.kotlin:kotlin-stdlib-jre7:$kotlin_version"
Convert Existing Java Files to Kotlin
The second method is to convert an existing Java file into a Kotlin file:
- Select the file you want to convert in Android Studio’s Project view.
- Select Code > Convert Java file to Kotlin file from the Android Studio toolbar. This runs the Java file through a converter, generating the equivalent Kotlin code.
- At this point, Android Studio will display a banner informing you that Kotlin isn’t configured in your project. Click the Configure link that appears in this banner.
- Select Android with Gradle.
- Choose from All modules, All modules containing Kotlin files, or select the specific module where you want to support Kotlin.
- Click OK.
Add a Kotlin Class to an Existing Project
The final method is to create a new Kotlin class, by Control-clicking the directory where you want to create your class, and then selecting New > Kotlin file / class. Again, if your project isn’t configured to support Kotlin, then Android Studio will display the Configure banner.
And, if you’re not familiar with Kotlin and want to find out what all the fuss is about, then we’ve published a whole series walking you through the process of getting started with Kotlin for Android development.
 Android SDKJava vs. Kotlin: Should You Be Using Kotlin for Android Development?
 Android StudioCoding Functional Android Apps in Kotlin: Getting Started
 Android SDKCoding Functional Android Apps in Kotlin: Lambdas, Null Safety & More
A New Android Profiler
Android Studio 3.0 Preview replaces the familiar Android Monitor window with a brand-new Android Profiler.
To take a look at this new tool, select View > Tool Windows > Android Profiler from the Android Studio toolbar, or click the Android Profiler tab that appears along the bottom of the IDE window.
Similar to Android Monitor, the Android Profiler can only communicate with a running app, so make sure the app you want to test is running on an AVD or a connected smartphone or tablet, and that it’s currently visible onscreen. Select the device and the process you want to profile, using the dropdown menus.
As soon as you’ve selected a process, the Android Profiler attaches to that process and displays a timeline of your app’s Network, CPU and Memory usage, which updates in real time.

To view more information about Network, CPU or Memory, simply click that section of the Android Profiler, which launches a new profiler dedicated entirely to your chosen topic.
Network Profiler
This Profiler displays a timeline of your network activity, displaying data sent and received, and the current number of connections. Note that the Network Profiler currently only supports the HttpURLConnection and OkHttp libraries, so you may be unable to view your app’s network activity if you’re using a different library.
CPU Profiler
This Profiler displays your app’s CPU usage and thread activity. You can also see exactly which methods are being executed and the CPU resources each method consumes, by recording a method trace.
To record a trace, open the dropdown menu and select either Sampled or Instrumented, and then click the Record button. Spend some time interacting with your app, making sure to perform the actions you want to record, and then click the Stop recording button. The CPU Profiler will then display all the data recorded during this sampling period.
Memory Profiler
This Profiler helps you identify memory leaks, memory churn and undesirable memory allocation patterns, by displaying a graph of your app’s memory use. You can also use the Memory Profiler to capture a heap dump, which provides a snapshot of the objects your app has allocated, along with how much memory each object is using and where references to each object are being held in your code. Finally, you can record your app’s memory allocations, by clicking the Record memory allocations button.
Create Standalone Instant App Modules
Android Instant Apps allow users to run applications instantly via a URL, without having to install the application first. This feature allows you to make your app’s most important features available to more users—while hopefully tempting them into downloading the full version of your app in the process.
The first step to adding Android Instant App functionality to your project is to break your app into smaller modules, so users have the option to download a specific portion of your project. Since breaking your app into multiple, standalone modules isn’t exactly an easy task, Android Studio 3.0 Preview introduces a feature to help you modularize any class within your application:
- Open the class you want to modularize, and highlight the class name.
- Control-click the class, and then select Refactor > Modularize.

- Select Preview to see the exact classes, methods and resources that are going to be incorporated into this new module.
- If required, deselect some of the items you don’t want to include in this module. If you do remove one or more items, then you’ll typically need to spend some time adjusting the resulting module’s code, to make sure it functions correctly.
- When you’re happy with your selection, go ahead and create your module by clicking OK.
Improved Java 8 Support
Android Studio 3.0 Preview 1 provides built-in support for a subset of Java 8 language features and the third-party libraries that use them, specifically:
- Lambda expressions
- Method References
- Type Annotations
- Default and static interface methods
- Repeating annotations
In addition, the following Java 8 features are compatible with API level 24 and higher:
java.lang.annotation.Repeatablejava.util.functionjava.lang.reflect.Method.isDefault()java.lang.FunctionalInterfacejava.util.streamannotatedElement.getAnnotationsByType(Class)
To take advantage of this improved Java 8 support, you’ll need to update to version 3.0.0-alpha1 (or higher) of the Gradle plugin. Start by opening your gradle-wrapper.properties file and updating the distributionUrl:
distributionUrl=https://services.gradle.org/distributions/gradle-4.0-milestone-1-all.zip
Next, open your project-level build.gradle file and make sure you’re using Google’s new Maven repository. You’ll also need to update to version 3.0.0-alpha1 of the Gradle plugin:
buildscript {
  repositories {
      maven { url 'https://maven.google.com' }
      jcenter()
  }

   dependencies {
       classpath 'com.android.tools.build:gradle:3.0.0-alpha1'
If you’ve previously enabled the Jack compiler, then you’ll need to disable it in order to take advantage of Android Studio’s improved Java 8 support. To remove Jack, open your module-level build.gradle file and delete the jackOptions block:
android {
...
...
...
   defaultConfig {

       // Remove the following block//

       jackOptions {
           enabled true
           ...
       }

   }
Finally, you’ll need to add the Java 8 compileOptions block to your build.gradle file, if you haven’t already:
compileOptions {
   sourceCompatibility JavaVersion.VERSION_1_8
   targetCompatibility JavaVersion.VERSION_1_8
 }

}
Custom Fonts Made Even Easier
Google is about to make it much easier to add custom fonts to your app, by upgrading fonts to a fully-supported resource type in Android O. We’ve already explored working with custom fonts in detail, but the Android Studio 3.0 Preview adds a handy feature that makes it even easier to browse for custom fonts and add them to your project:
- Open any layout resource file that contains a
TextView. - Select the Design tab.
- In the layout editor, select the TextView. The Properties menu should open along the left-hand side of the Android Studio window.
- Scroll to the menu’s textAppearance section, and then click its accompanying arrow icon to expand this section. Open the fontFamily dropdown, and select More fonts. This opens a window where you can browse a library of fonts that are available to download.

- To add a font to your project, select it and then click OK.
- Open your project’s res/font folder, and you’ll see that this font has been added to your project, ready for you to use.
- To apply this font to any piece of text, simply add the attribute
android:fontFamily="@font/name-of-your-font.”
Other Notable Updates
Android Studio 3.0 Preview also introduces some useful new tools:
APK Debugger
This tool makes it easier to profile and debug APKs—simply select File > Profile or debug APK from the Android Studio toolbar, and then select the APK you want to take a closer look at. Alternatively, select Profile or debug APK from Android Studio’s Welcome screen.
Device File Explorer
You can use this tool to interact with the connected device’s file system, allowing you to view, copy and delete files, and also upload files to your Android device. To use this tool, either select the Device File Explorer tab towards the bottom-right of the Android Studio screen, or select View > Tool Windows > Device File Explorer from the Android Studio toolbar.
Adaptive Icon Wizard
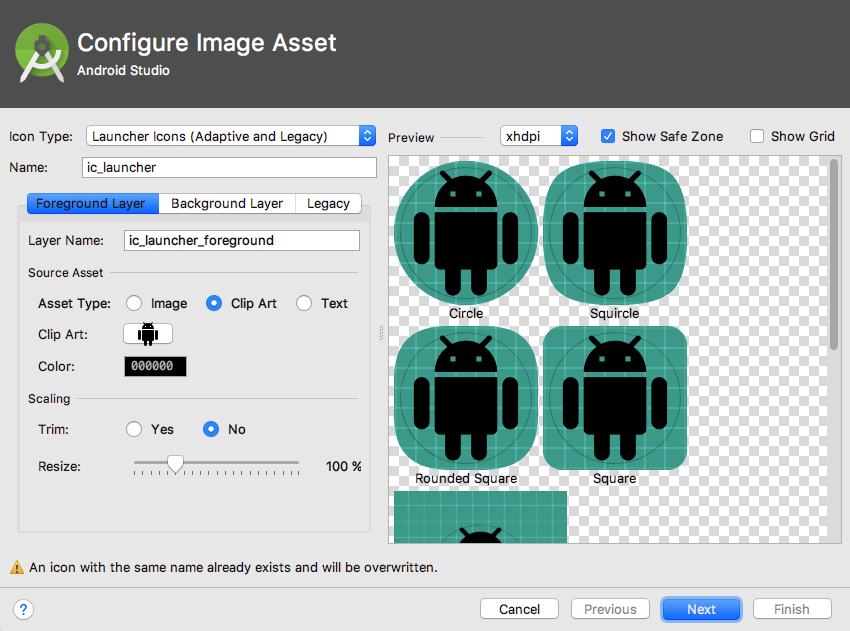
In Android O, Original Equipment Manufacturers will be able to apply a mask to all the application launcher icons across their device. To make sure your launcher icon displays correctly regardless of the mask being used, you’ll need to provide an adaptive launcher icon.
We’ve explored creating adaptive icons previously, but the new Android Studio Preview introduces a dedicated wizard that makes it easier to build these adaptive icons. To launch the wizard, Control-click your project’s res folder and select New > Image Asset. In the window that appears, open the Icon type dropdown, and set it to Launcher Icons (Adaptive and Legacy). You can then build your adaptive icon by selecting a foreground and background layer.

Conclusion
In this tip, we explored some of the most exciting new tools and features already available in Android Studio 3.0 Preview, including built-in support for the Kotlin programming language, improved Java 8 support, and the all-new Android Profiler. With all the new features and tools available, Android app development is about to get even more exciting!
While you’re here, check out some of our other tutorials and our video courses on Android app development!
 AndroidCreate a Voice-Controlled Android App
 Android SDKServerless Apps With Firebase Cloud Functions
 Android SDKReactive Programming Operators in RxJava 2


