Channels from Pusher is a platform that allows you to give your apps seamless real-time data.
In this post, I’ll show you how to write the functional components of a very simple chat app. It’s a stripped-down example, but you’ll see how Channels can simplify the implementation of real-time communication in a web app.
Setting Up the Server
Our server application is a single PHP file called messages.php which will handle the POST requests coming from the browser. Our message handler will send the client’s messages to the Channels service, which will then broadcast those messages to other clients.
When using PHP for your server application, you want to download and use the Channels library, and you can install that library using composer and the following command:
composer require pusher/pusher-php-server
The code for messages.php is almost an exact copy of what you can find on the Getting Started page in your Channels dashboard. There are just a few modifications.
First, you need to require the autoload.php file to use the Pusher library:
require './../vendor/autoload.php';
Next, the data coming from the client is in JSON format, so we obviously want to decode it into a workable PHP array.
$data = json_decode(file_get_contents('php://input'), true);
We then want to set up our Pusher object so that we can then trigger an event.
$options = array(
  'cluster' => 'us2'
);

$pusher = new PusherPusher(
  '427017da1bd2036904f3',
  'c46fabbaf65c4c31686b',
  '534815',
  $options
);
My PHP installation does not work if the encrypted option is enabled, so I omitted it from my code. Your mileage may vary, but it’s important to note that the encrypted option determines whether or not the data sent between the server and Channels is encrypted. It has nothing to do with the connection between Channels and your clients—the client library handles that.
The final line of our server’s code sends the message data to Channels:
$pusher->trigger('anon-chat', 'send-message', $data);
As with other server libraries, we pass three things to the trigger() method:
- The channel name:
anon-chat - The event name:
send-message - The payload:
$data
Notice that the channel and event names are different than the channel and event names used on the Getting Started page. You do not have to create new channels or define custom events in the dashboard; just use whatever channel and event names you want in your code.
Completing the Client
Our client is a web page with three Vue.js components powering the UI. The main component is called ChannelsChat, and it is where we will put our Pusher object that listens for send-message events in the anon-chat channel. Let’s use the created hook.
created() {
  let pusher = new Pusher('427017da1bd2036904f3', {
    cluster: 'us2',
    encrypted: true
  });

  let channel = pusher.subscribe('anon-chat');

  channel.bind(
    'send-message',
    function() {} // to be implemented later
  );
}
In this code, we create the Pusher object, subscribe to the anon-chat channel, and listen for send-message events.
Because this is a chat application, we need to store the message history so that whoever is using the application can see all the messages they received during their session. The easiest way to accomplish this is to store each message as an element in the array. So let’s add a messages data property to this component, as shown in the following code:
data() {
  return {
    messages: []
  }
}
Then, when we receive a message, we’ll simply push() it to our array, as shown in the following code:
channel.bind(
  'send-message',
  (data) => this.messages.push(data.message)
);
We’ll then pass the messages to the MessageView component:
Sending Messages
The last of our code belongs in the MessageSend component; when the user types a message and clicks the Send button, we need to send that data to messages.php.
First, let’s make sure the user typed something into the text box. Otherwise, there’s no need to do anything!
sendMessage(e) {
  if (!this.message) {
    return;
  }

  // to be continued...
The message property is bound to the ‘s value, so we’ll use that to determine if we have any data.
Next, we send the POST request to message.php, and the data is an object with a message property.
  // (continued)

  axios.post('/message.php', {
    message: this.message
  }).then(() => {
    this.message = '';
  }).catch((err) => {
    alert(err);
  });
}
If the request is successful, we clear the message property’s value, which in turn clears the ‘s value (remember that they’re bound). If the request fails, an alert box tells the user that an error occurred.

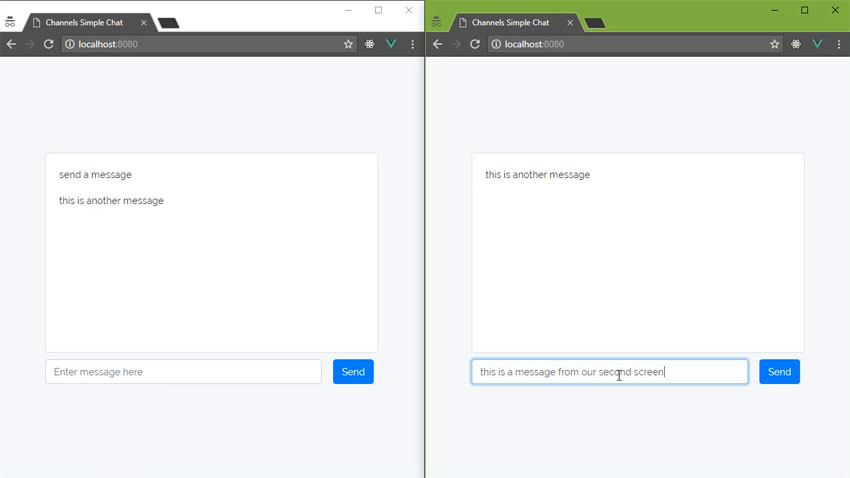
That’s it for the code. So open two browser windows and point them to index.php. Start sending messages and you should see both windows automatically update and display the messages.
Conclusion
As you can see, Channels makes it incredibly easy to quickly add real-time communication to your applications, and it didn’t even require a lot of code!
You also learned that you can create channels and events on the fly as you write your code. There’s no need to set them up prior to using them.
And finally, you learned how you can set up your applications to incorporate real-time communication. Simply handle incoming user input from your server, and trigger events based on that input.
Powered by WPeMatico


