

One of Ionic’s strengths is in the services that it offers on top of the framework. This includes services for authenticating users of your app, push notifications, and analytics. In this series, we’ll be learning about those three services by creating an app which uses each of them.
The first service we’re going to look at is the Auth service. This allows us to implement authentication in an Ionic app without writing a single line of back-end code. Or if you already have an existing authentication system, you can also use that. The service supports the following authentication methods:
- Email/Password: user is registered by supplying their email and password.
- Social Login: user is registered using their social media profile. This currently includes Facebook, Google, Twitter, Instagram, LinkedIn, and GitHub.
- Custom: user is registered by making use of an existing authentication system.
In this tutorial, we’re only going to cover email/password and social login with Facebook.
What You’ll Be Creating
Before we proceed, it’s always good to have a general idea of what we’re going to create, and what the flow of the app will be like. The app will have the following pages:
- home page
- signup page
- user page
Home Page
The home page is the default page of the app where the user can log in with their email/password or their Facebook account.
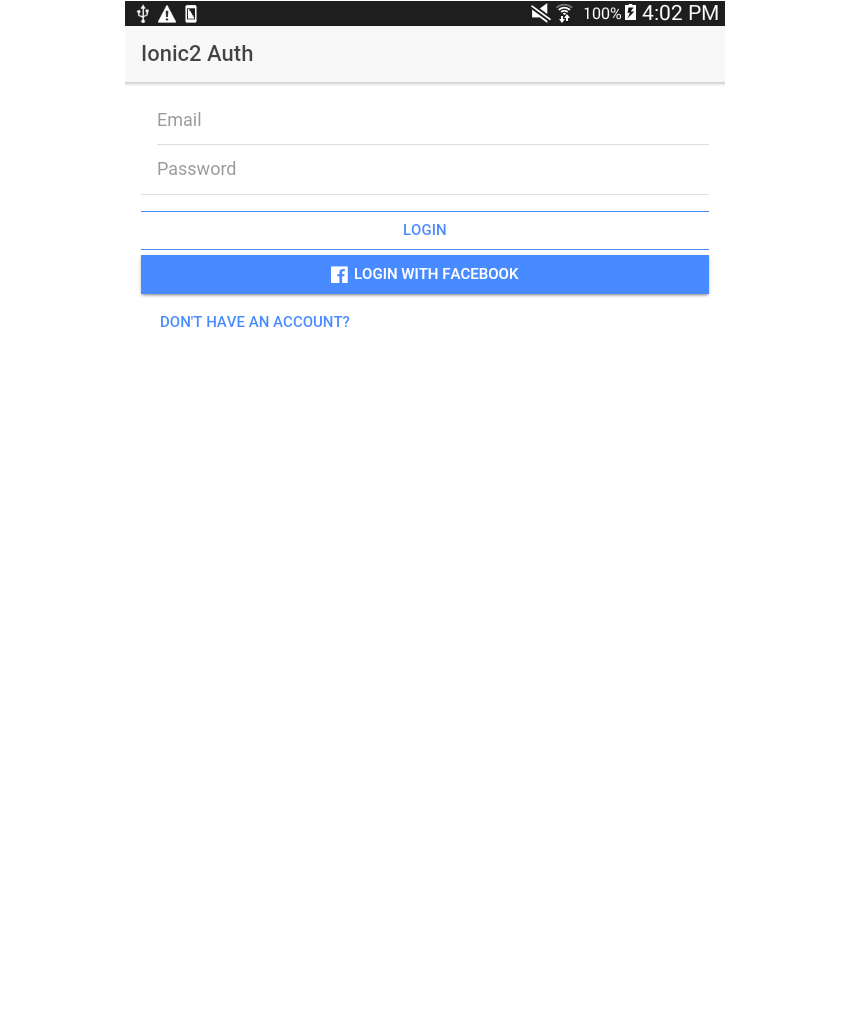
When the user clicks on the Login with Facebook button, a screen similar to the following is displayed, and once the user agrees, the user is logged in to the app:

Signup Page
The signup page is where the user can register by entering their email and password. Facebook login doesn’t require any signup because the user info is supplied by the Facebook API.

User Page
The final page is the user page, which can be seen only when the user has already logged in.

Bootstrap a New Ionic App
Now that you know what we’re making, let’s get started building our app!
First, we bootstrap a new Ionic app using the blank starter template:
ionic start authApp blank
Navigate inside the newly created authApp folder. This serves as the root directory of the project.
To quickly get set up with the UI of the app, I’ve created a GitHub repo where you can find the starter source files. Download the repo, navigate inside the starter folder, and copy the src folder over to the root of the Ionic project that you just created. This contains the template files for each of the pages of the app. I’ll explain to you in more detail what each of those files does in a later section.
Serve the project so you can immediately see your changes while developing the app:
ionic serve
Create an Ionic Account
Since we’ll be using Ionic’s back-end to handle user authentication, we need a way to manage the users of the app. This is where the Ionic account comes in. It allows you to manage your Ionic apps and the services that they use. This includes managing the Auth service. You can create an Ionic account by visiting the Ionic.io signup page.
Connect the App to Ionic Services
Next, navigate to the root directory of the project and install the Ionic Cloud plugin:
npm install @ionic/cloud-angular --save
This plugin will allow the app to easily interact with Ionic services.
After that, you can initialize the app to use Ionic services:
ionic io init
This prompts you to log in with your Ionic account. Once you’ve entered the correct login details, the command-line tool will automatically create a new app record under your Ionic account. This record is connected to the app that you’re developing.
You can verify that this step has worked by opening the .io-config.json file and the ionic.config.json file at the root of your project. The app_id should be the same as the app ID assigned to the newly created app in your Ionic dashboard.
Home Page
Navigate inside the src/pages/home directory to see the files for the home page. Open the home.html file and you’ll see the following:
Ionic2 Auth Password
This page will ask the user for their email and password or to log in with their Facebook account. If the user has no account yet, they can click on the signup button to access the signup page. We’ll go back to the specifics of this page later on as we move on to the login part. I’m just showing it to you so you can see the code for navigating to the signup page.
Next, open the home.ts file. For now, it only contains some boilerplate code for navigating to the signup and user page. Later on, we’re going to go back to this page to add the code for logging the user in.
User Sign Up
The layout of the signup page is found in src/pages/signup-page/signup-page.html. Take a look at this file and you’ll find a simple form with an email field and a password field.
Next, let’s take a look at the signup-page.ts file.
Let’s break this down. First, it imports the controllers for creating alerts and loaders:
import { AlertController, LoadingController } from 'ionic-angular';
Then, it imports the classes needed from the Cloud Client:
import { Auth, UserDetails, IDetailedError } from '@ionic/cloud-angular';
- The
Authservice which deals with user registration, login, and sign-out. -
UserDetailsis the type used for defining the user details when registering or logging in a user. -
IDetailedErroris used for determining the exact reason for the error that occurred. This allows us to provide user-friendly error messages to the user whenever an error occurs.
Declare the variables to be used for storing the email and password input by the user. This should be the same as the name you’ve given to the value and ngModel attributes in the layout file.
export class SignupPage {

  email: string;
  password: string;

  constructor(public auth: Auth, public alertCtrl: AlertController, public loadingCtrl: LoadingController) {

  }

  register() {
    ...
  }

}
Next is the register method, which is called when the Register button is pressed. Let’s code this method together.
First it fires up a loader, and then makes it automatically close after five seconds (so that in case something goes wrong, the user isn’t left with a loading animation that is spinning forever).
register() {
  let loader = this.loadingCtrl.create({
    content: "Signing you up..."
  });
  loader.present();

  setTimeout(() => {
    loader.dismiss();
  }, 5000);
Next, let’s create an object to store the user details:
  let details: UserDetails = {
    'email': this.email,
    'password': this.password
  };
Finally, we’ll call the signup() method from the Auth service and supply the user details as the argument. This returns a promise, which we unwrap with then(). Once a success response is received from the back-end, the first function that you pass to then() will get executed; otherwise, the second function will get executed.
  this.auth.signup(details).then((res) => {

    loader.dismiss(); //hide the loader
    let alert = this.alertCtrl.create({
      title: "You're registered!",
      subTitle: 'You can now login.',
      buttons: ['OK']
    });
    alert.present(); //show alert box

  }, (err: IDetailedError) => {
      ...
  });
If an error response is received from Ionic Auth, we’ll loop through the array of errors and construct an error message based on the type of error received. Here you can find the list of Auth signup errors that can occur.
  loader.dismiss();

  var error_message = '';
  for (let e of err.details) {
    if (e === 'conflict_email') {
	  error_message += "Email already exists.
";
	} else {
	  error_message += "Invalid credentials.
";
	}
  }

  let alert = this.alertCtrl.create({
	title: error_message,
	subTitle: 'Please try again.',
	buttons: ['OK']
  });
  alert.present();
}
Once that’s done, you can try the app in your browser. The email/password login doesn’t have any plugin or hardware dependencies, so you should be able to test it out in the browser. You can then find the newly registered user in the Auth tab of your Ionic app dashboard.
Setting Up Facebook App
The next step is to set up the app so that it can handle native Facebook logins. First, you need to create a Facebook app. You can do that by logging in to your Facebook account and then going to the Facebook Developer Site. From there, create a new app:

Once the app is created, click on the Add Product link on the sidebar and select Facebook Login. This will open the Quickstart screen by default. We don’t really need that, so go ahead and click on the Settings link right below the Facebook Login. That should show you the following screen:

Here you need to enable the Embedded Browser OAuth Login setting and add https://api.ionic.io/auth/integrations/facebook as the value for the Valid OAuth redirect URIs. Save the changes once that’s done.
Next, you need to connect Ionic Auth to the Facebook app that you’ve just created. Go to your Ionic dashboard and select the app that was created earlier (see the “Connect the App to Ionic Services” section). Click on the Settings tab and then User Auth. Under the Social Providers, click on the Setup button next to Facebook:

Enter the App ID and App Secret of the Facebook app that you created earlier and hit Enable.
Install the Facebook Plugin
Next, install the Facebook plugin for Cordova. Unlike most plugins, this requires you to supply a bit of information: the Facebook App ID and App Name. You can just copy this information from the Facebook app dashboard.
cordova plugin add cordova-plugin-facebook4 --save --variable APP_ID="YOUR FACEBOOK APP ID" --variable APP_NAME="YOUR FACEBOOK APP NAME"
Configure Facebook Service
Once that’s done, the last thing that you need to do is to go back to your project, open the src/app/app.module.ts file, and add the CloudSettings and CloudModule services from the cloud-angular package:
import { CloudSettings, CloudModule } from '@ionic/cloud-angular';
Declare the cloudSettings object. This contains the app_id of your Ionic app and any additional permissions (scope) that you want to ask from the users of your app. By default, this already asks for the email and public_profile.
const cloudSettings: CloudSettings = {
  'core': {
    'app_id': 'YOUR IONIC APP ID'
  },
  'auth': {
    'facebook': {
      'scope': []
    }
  }
};
If you want to ask for more data from your users, you can find a list of permissions on this page: Facebook Login Permissions.
Next, let Ionic know of the cloudSettings you’ve just added:
@NgModule({
  declarations: [
    MyApp,
    HomePage,
    SignupPage
  ],
  imports: [
    BrowserModule,
    IonicModule.forRoot(MyApp),
    CloudModule.forRoot(cloudSettings) // <--add this
  ],
  ...
Later on, when you add other social providers to your app, a similar process is followed.
Logging the User In
Now it's time to go back to the home page and make some changes. The HTML template already has everything we need, so we only need to update the script. Go ahead and open the src/pages/home/home.ts file. At the top of the file, import the following in addition to what you already have earlier:
import { NavController, AlertController, LoadingController } from 'ionic-angular';
import { Auth, FacebookAuth, User, IDetailedError } from '@ionic/cloud-angular';
import { UserPage } from '../user-page/user-page';
Inside the constructor, determine if a user is currently logged in or not. If a user is already logged in, we automatically navigate to the User Page.
export class HomePage {

  //declare variables for storing the user and email inputted by the user
  email: string;
  password: string;

  constructor(public navCtrl: NavController, public auth: Auth, public facebookAuth: FacebookAuth, public user: User, public alertCtrl: AlertController, public loadingCtrl: LoadingController) {
    if (this.auth.isAuthenticated()) {
      this.navCtrl.push(UserPage);
    }
  }

  ...
}
Next, when the Login button is pressed, we start by displaying a loading animation.
login(type) {

    let loader = this.loadingCtrl.create({
      content: "Logging in..."
    });

    loader.present();

    setTimeout(() => {
      loader.dismiss();
    }, 5000);

    ...
}
As you saw in the src/pages/home/home.html file earlier, a string that represents which login button has been pressed (either the email/password login button or the Facebook login button) is passed to the login() function. This allows us to determine which login code to execute. If the type is 'fb', it means that the Facebook login button was pressed, so we call the login() method of the FacebookAuth service.
if(type == 'fb'){
  this.facebookAuth.login().then((res) => {

    loader.dismiss();
    this.navCtrl.push(UserPage);

  }, (err) => {
    //hide the loader and navigate to the user page
    loader.dismiss();
    let alert = this.alertCtrl.create({
      title: "Error while logging in to Facebook.",
      subTitle: 'Please try again.',
      buttons: ['OK']
    });
    alert.present();

  });
}
Otherwise, the email/password login button was pressed, and we should log the user in with the details entered in the login form.
else{
  let details: UserDetails = {
    'email': this.email,
	'password': this.password
  };

  this.auth.login('basic', details).then((res) => {

	loader.dismiss();
	this.email = '';
	this.password = '';
	this.navCtrl.push(UserPage);

  }, (err) => {

	loader.dismiss();
	this.email = '';
	this.password = '';
	let alert = this.alertCtrl.create({
	  title: "Invalid Credentials.",
	  subTitle: 'Please try again.',
	  buttons: ['OK']
	});
	alert.present();

  });
Take a look at the final version of the home.ts file to see how it should all look.
User Page
The last page is the User page.
The layout, in src/pages/user-page/user-page.html, displays the profile photo of the user and their username. If the user signed up with their email/password, the username will be the email address of the user and the profile photo will be the default profile photo assigned by Ionic. On the other hand, if the user signed up with Facebook, their profile photo will be their Facebook profile photo and their username will be their full name.
Next, look at the user-page.ts file.
Under the ionic-angular package, we're importing the Platform service aside from NavController. This is used to get information about the current device. It also has methods for listening to hardware events such as when the hardware back button in Android is pressed.
import { NavController, Platform } from 'ionic-angular';
And for the cloud-angular package, we need the Auth, FacebookAuth, and User services:
import { Auth, FacebookAuth, User } from '@ionic/cloud-angular';
Inside the class constructor, determine if the user logged in with their email/password user or their Facebook account. Fill in the username and photo based on that. Then, below that, assign a function to be executed when the hardware back button is pressed. The registerBackButtonAction() accepts two arguments: the function to be executed and the priority. If there are more than one of these in the app, only the highest priority will be executed. But since we only need this in this screen, we just put in 1.
export class UserPage {

  public username;
  public photo;

  constructor(public navCtrl: NavController, public auth: Auth, public facebookAuth: FacebookAuth, public user: User, public platform: Platform) {

    if(this.user.details.hasOwnProperty('email')){
      this.username = this.user.details.email;
      this.photo = this.user.details.image;
    }else{
      this.username = this.user.social.facebook.data.full_name;
      this.photo = this.user.social.facebook.data.profile_picture;
    }

    this.platform.registerBackButtonAction(() => {
      this.logoutUser.call(this);
    }, 1);

  }
}
The logoutUser() method contains the logic for logging the user out. The first thing it does is to determine if a user is actually logged in. If a user is logged in, we determine whether the user is a Facebook user or an email/password user.
This can be done by checking the email property under the user.details object. If this property exists, that means that the user is an email/password user. So if it's otherwise, we assume that it's a Facebook user. Calling the logout() method in Auth and FacebookAuth clears out the current user of the app.
logoutUser() {

    if (this.auth.isAuthenticated()) {
	  if(this.user.details.hasOwnProperty('email')){
	    this.auth.logout();
	  }else{
	    this.facebookAuth.logout();
	  }
	}

	this.navCtrl.pop(); //go back to home page
}
Running the App on a Device
Now we can try out our app! First, set up the platform and build the debug apk:
ionic platform add android
ionic build android
For the Facebook login to work, you need to supply the hash of the apk file to the Facebook app. You can determine the hash by executing the following command:
keytool -list -printcert -jarfile [path_to_your_apk] | grep -Po "(?<=SHA1:) .*" | xxd -r -p | openssl base64
Next, go to your Facebook app basic settings page and click on the Add Platform button in the bottom part of the screen. Select Android as the platform. You'll then see the following form:

Fill out the Google Play Package Name and Key Hashes. You can put anything you want as the value for the Google Play Package Name as long as it follows the same format as the apps in Google Play (e.g. com.ionicframework.authapp316678). For the Key Hashes, you need to put in the hash returned from earlier. Don't forget to hit Save Changes when you're done.
Once that's done, you can now copy the android-debug.apk from the platforms/android/build/outputs/apk folder to your device, install it, and then run.
Conclusion and Next Steps
That's it! In this tutorial, you've learned how to make use of the Ionic Auth service to easily implement authentication in your Ionic app. We've used email/password authentication and Facebook login in this tutorial, but there are other options, and it should be easy for you to add those to your app as well.
Here are some next steps you could try on your own that would take your app to the next level.
- Store additional user information—aside from the email and password, you can also store additional information for your users.
- Use other social login providers—as mentioned at the beginning of the article, you can also implement social login with the following services: Google, Twitter, Instagram, LinkedIn, and GitHub.
- Add a password reset functionality—password resets can be implemented using Ionic's password reset forms, or you can create your own.
- Custom authentication—if you already have an existing back-end which handles the user authentication for your service, you might need to implement custom authentication.
That's all for now. Stay tuned for more articles on using Ionic services! And in the meantime, check out some of our other great posts on cross-platform mobile app development.
 Ionic 2Introduction to Ionic 2
 Ionic 2Code Your First Ionic 2 App: A Photo Sharing App
 App Templates15 Best Ionic App Templates
 Mobile DevelopmentBack-End as a Service for Mobile Apps


