
Introduction
Beyond enabling iOS developers to easily store data on the cloud, as well as authenticating users through their robust SDKs, Firebase also provides a convenient storage solution for media. Firebase Storage allows developers to store and retrieve audio, image, and video files on the cloud. That is, Firebase Storage exposes a set of SDKs to give developers the ability to manage their user-generated content assets alongside its sibling product, the Firebase Realtime Database, which stores user text content.
However, Firebase Storage is more than just a storage container for rich media assets. It assists developers by offering offline synchronization for users and their devices, queuing and resuming images and videos when the user goes off and back online. This works similarly to how Firebase Realtime Database orchestrates synchronization of user data to the back-end.
This tutorial continues from our previous tutorial on Getting Started With Firebase Authentication for iOS, where we looked at how to manage, store and work with users in Firebase.
 FirebaseGet Started With Firebase Authentication for iOS
Objectives of This Tutorial
This tutorial will expose you to the Firebase Storage SDKs, to help you manage your app’s media assets—such as image, audio and video files—storing them remotely on the cloud, and retrieving them throughout your app. In this tutorial, you will learn how to:
- set up your app for Firebase Storage
- create and work with storage references
- upload media to Firebase Storage
- download media from Firebase Storage
Assumed Knowledge
This tutorial assumes you have had some exposure to Firebase, and a background developing with Swift and Xcode. It is also important that you have gone through our Get Started With Firebase Authentication for iOS tutorial first as you will need to authenticate your users prior to accessing much of the Firebase Storage functionality, including asset paths.
What Is Firebase Storage?
As a developer, you can use the Firebase Realtime Database to access and interact with your Firebase Storage bucket in a serverless fashion, without the need to create and host your own servers. Firebase Storage makes use of local on-device caching to store assets when offline and serve assets when the user gets back online, with the local data automatically synchronized.
Developers no longer have to deal with the complexities of synchronizing data and content through Apple’s standard iOS networking libraries, and having to deal with multiple scenarios that may cause transfer interruptions.
In fact, the Firebase products recognize that real-world mobile users face the prospect of interrupted or low-signal situations. Being able to synchronize data on-device for later transfer makes for a much better user experience, whilst saving developers a lot of work.
Security is also paramount with Firebase Storage, as it is with the rest of the Firebase suite of products. This means developers can restrict access to storage items by authenticating users using Firebase Authentication, which is built on top of an imperative security model that allows control of access to paths, files, and metadata on a role-by-role basis.
Finally, apps hosted on Firebase Storage benefit from a Google infrastructure that scales as the user base grows. We will explore some of these concepts later in the tutorial, but to start with, let’s go through setting up your app to work with Firebase. Then we’ll take a look at Storage Reference pointers.
Set Up the Project
If you have worked with Firebase before, a lot of this should be familiar to you. Otherwise, you will need to create an account in Firebase, and follow the instructions in the Set Up the Project section of the article Get Started With Firebase Authentication for iOS.
You can download the complete source code for this project by entering the following in terminal:
$ git clone [email protected]:tutsplus/get-started-with-firebase-storage-for-ios.git
For Storage, we will need to add Firebase/Storage to our Podfile, as shown below:
pod 'Firebase/Core'
pod 'Firebase/Storage'
Save and then enter the following in your terminal to build the pods:
pod install
Within the AppDelegate application:didFinishLaunchingWithOptions: method, the following line is present:
FirebaseApp.configure()
Ensure you also have configured your project via the Firebase Console correctly, as described in the Set Up the Project section of the Get Started With Firebase Authentication for iOS tutorial.
Once your environment is ready, we can move on to taking a look at storage references, starting with how to create a reference pointer.
Creating & Working With Storage References
Using Firebase Storage, you can interact with your own cloud bucket, which represents a filesystem of your stored images and videos. You use what is called a storage reference to a particular path or file within a path, within the filesystem that you then give your app access to, so that you can interact with it by transferring data.
Having a pointer to a path or file within the path allows you to upload, download, update, or delete that path. To create a reference, you simply create an instance of Storage.storage(), as follows:
let store = Storage.storage()
let storeRef = store.reference()
You now have a reference to the root of your filesystem hierarchy, and you can set the structure for your bucket as you wish, for example by creating a folder structure.
To access files and paths in your bucket, call the child() method, as follows:
let userProfilesRef = storeRef.child("images/profiles")
...
let logoRef = storeRef.child("images/logo.png")
References are a shorthand for the complete Firebase path to your file via your bucket, instead of entering your entire Firebase bucket URL path. Besides the child() method, you can also navigate your hierarchy using the root() and parent() methods, and you can chain these methods, as you will see below:
let userProfilesRef = logoRef.parent()?.child("profiles")
As you can see, we would get the same results for userProfilesRef as we had in the previous block of code. The great thing about references is that they are extremely lightweight, so you can have as many references within your app instance as you wish, without affecting the performance of your app.
Now that you understand the fundamental aspects of working with Firebase Storage references, let’s move on to uploading and downloading files from your bucket.
Uploading Media to Firebase Storage
The simplest way to upload a file is to pass in an NSData representation of its contents in memory:
let uploadUserProfileTask = userProfilesRef.child("(userID).png").putData(data, metadata: nil) { (metadata, error) in
  guard let metadata = metadata else {
    print("Error occurred: (error)")
    return
  }
    print("download url for profile is (metadata.downloadURL)")
}
You can manage your uploads in progress, by controlling when to commence, pause, resume, and cancel your uploads. You can also listen for the subsequent events that are triggered, which are:
- pause
- resume
- cancel
Referencing the uploadUserProfileTask we used earlier, you can control your uploads using the following methods:
uploadUserProfileTask.pause()
uploadUserProfileTask.resume()
uploadUserProfileTask.cancel()
You can also monitor a transfer in progress by simply setting an observer to the task instance object:
let progressObserver = uploadUserProfileTask.observe(.progress) { snapshot in
  let percentComplete = 100.0 * Double(snapshot.progress!.completedUnitCount)
    / Double(snapshot.progress!.totalUnitCount)
    print(percentComplete)
}
Let’s see how you would approach downloading images or videos from the storage bucket.
Downloading Media From Firebase Storage
To be able to download and present your images, you start off as you did with uploading, and declare a reference pointer to your designated path. Then commence download using the closure function dataWithMaxSize:completion::
logoRef.getData(maxSize: 1 * 1024 * 1024) { data, error in
  if let error = error {
    print("Error (error)")
  } else {
    let logoImage = UIImage(data: data!)
  }
}
If you make use of FirebaseUI, you can simply have FirebaseUI manage the downloading, caching, and displaying of images for you in an even simpler way:
...
self.imageView.sd_setImage(with: logoRef, placeholderImage: placeholderImage)
For information on implementing FirebaseUI, refer to the FirebaseUI documentation.
Managing downloads works in a similar manner to managing and controlling uploads. Here’s an example:
let downloadTask = storageRef.child("images/logo.jpg").write(toFile: localFile)

// Pause the download
downloadTask.pause()

// Resume the download
downloadTask.resume()

// Cancel the download
downloadTask.cancel()
You can also designate an observer as we did for uploads, to track the progress of the download transfer in real time:
let progressObserverDownload = downloadTask.observe(.progress) { snapshot in
  let percentComplete = 100.0 * Double(snapshot.progress!.completedUnitCount)
    / Double(snapshot.progress!.totalUnitCount)
    print(percentComplete)
}
Armed with an overview of how to work with references and how to upload and download assets from your bucket, you are now ready to take a look at how to implement Firebase Storage for our sample project: FirebaseDo.
The Sample FirebaseDo Project
You should have cloned the FirebaseDo app by now, so go ahead and build and run the project. You will see that all it does is authenticate users, using either phone or email:

Our goal is to incrementally improve on the app’s functionality, so that once our users authenticate successfully, they will be able to upload a profile photo. Most of our work will be in the HomeViewController and its Associated Storyboard. Let’s address the HomeViewController file first.
The HomeViewController
Before we jump into the methods of this controller, we’ll need to add the UIImagePickerControllerDelegate protocol to our class so that we can work with its delegate methods. We will also need to add a picker instance so that our users can choose a photo from their library.
class HomeViewController: UIViewController, FUIAuthDelegate, UIImagePickerControllerDelegate, UINavigationControllerDelegate  {

    @IBOutlet weak var myImageView: UIImageView!
    let picker = UIImagePickerController()

    ...
    fileprivate(set) var auth:Auth?
    fileprivate(set) var authUI: FUIAuth? //only set internally but get externally
    fileprivate(set) var authStateListenerHandle: AuthStateDidChangeListenerHandle?
Add the following towards the end of the viewDidLoad() method:
self.picker.delegate = self
self.refreshProfileImage()
We are going to implement the refreshProfileImage() method, which will be called to download the image we have displayed in our ViewController. We are going to first assert that the user is indeed authenticated, before creating a reference that will retrieve the user’s profile image from the /images/user_id/profile_photo.jpg path within our bucket. Finally, we’ll update our image view with the image retrieved.
func refreshProfileImage(){
        if let user = Auth.auth().currentUser{
            let store = Storage.storage()
            let storeRef = store.reference().child("images/(user.uid)/profile_photo.jpg")

            storeRef.getData(maxSize: 1 * 1024 * 1024) { data, error in
                if let error = error {
                    print("error: (error.localizedDescription)")
                } else {
                    let image = UIImage(data: data!)
                    self.myImageView.image = image
                }
            }
        }else{
            print("You should be logged in")
            self.loginAction(sender: self)
            return
        }

    }
Next, we create an @IBAction method for the photo library button which we will shortly connect to from our storyboard:
@IBAction func libraryAction(_ sender: Any) {
        self.picker.allowsEditing = false
        self.picker.sourceType = .photoLibrary
        self.picker.mediaTypes = UIImagePickerController.availableMediaTypes(for: .photoLibrary)!
        self.present(picker, animated: true, completion: {
            print("handle saving")
        })
    }
Finally, we add two delegate methods for our UIImagePickerController, to handle when the user cancels the UIImagePicker, as well as handling the selected image:
 func imagePickerControllerDidCancel(_ picker: UIImagePickerController) {
     dismiss(animated: true, completion: nil)
 }

func imagePickerController(_ picker: UIImagePickerController, didFinishPickingMediaWithInfo info: [String : Any]) {
        self.dismiss(animated: true, completion: nil)

        let profileImageFromPicker = info[UIImagePickerControllerOriginalImage] as! UIImage

        let metadata = StorageMetadata()
        metadata.contentType = "image/jpeg"

        let imageData: Data = UIImageJPEGRepresentation(profileImageFromPicker, 0.5)!

        let store = Storage.storage()
        let user = Auth.auth().currentUser
        if let user = user{
            let storeRef = store.reference().child("images/(user.uid)/profile_photo.jpg")
            ASProgressHud.showHUDAddedTo(self.view, animated: true, type: .default)
            let _ = storeRef.putData(imageData, metadata: metadata) { (metadata, error) in
                ASProgressHud.hideHUDForView(self.view, animated: true)
                guard let _ = metadata else {
                    print("error occurred: (error.debugDescription)")
                    return
                }

                self.myImageView.image = profileImageFromPicker
            }

        }

    }
Once the user selects an image, we dismiss the picker but keep a reference to the selected image. Next, we create a StorageMetadata() instance so that we can tell Firebase we are going to upload a JPEG file.
As we did in the refreshProfileImage() method, we are going to assert that the user is authenticated, and then create a reference to the images path where we want to store our user’s profile. Using the putData() method, we then asynchronously upload our image to the designated bucket location, before setting our image view to the newly selected image.
Before we can build and run our app, we will need to add the appropriate controls to our storyboard.
Storyboard
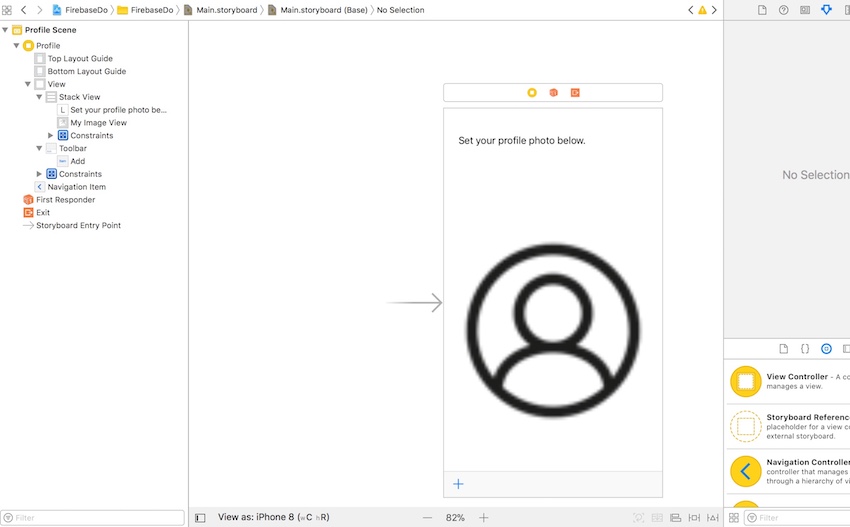
Within our main storyboard, add an image view with a placeholder image that will represent the user’s current profile, and then drag to associate the image view with the one we have declared as an @IBOutlet in our HomeViewController class. Next, add a toolbar with a button that you will use as an @IBAction to call the libraryAction() method we created earlier in the HomeViewController.
Your Storyboard should now resemble the following:
Absent of any errors, you can go ahead and build and run your app once again, and authenticate by either creating a new user or using an existing user’s set of credentials.
You will then be presented with the HomeViewController, where you will select the + button to add an image from your device or simulator’s photo library. Once you’ve chosen a photo, it will upload it to the Firebase bucket. You can confirm that it has successfully uploaded by going to the Storage tab of your Firebase Console, as shown below:

If you stop and re-run the app in Xcode, you should also see the image you last uploaded reappear, further confirming we have successfully uploaded and downloaded using Firebase Storage.
Conclusion
This tutorial demonstrated how to easy it is to add asynchronous asset storage and management to an existing Firebase app with just a few lines of code. This provides you with a convenient way to manage your app’s assets, while letting you handle offline synchronization elegantly and conveniently.
Firebase Storage is an obvious choice for iOS developers who are already within the Firebase ecosystem. It provides developers with the security of an imperative security model provided by Firebase Authentication, as well as the capability provided by the Firebase Realtime Database.
While you’re here, check out some of our other posts on iOS app development!
 iOS SDKHow to Update Your App for iOS 11: Drag and Drop
 iOS SDKRealm Mobile Database for iOS
-
FirebaseGet Started With Firebase Authentication for iOS
Powered by WPeMatico


