

Application widgets provide your users with easy access to your application’s most frequently used features, while giving your app a presence on the user’s homescreen. By adding a widget to your project, you can provide a better user experience, while encouraging users to remain engaged with your application, as every single time they glance at their homescreen they’ll see your widget, displaying some of your app’s most useful and interesting content.
In this three part series, we’re building an application widget that has all the functionality you’ll find in pretty much every Android application widget.
In the first post, we created a widget that retrieves and displays data, and performs a unique action in response to onClick events. However, our widget is still missing one crucial piece of functionality: it never updates with new information. A widget that never has anything new to offer isn’t all that useful, so we’ll give our widget two different ways to update.
 Android SDKCode a Widget for Android: Input and Display
By the end of this series, we’ll have expanded our widget to retrieve and display new data automatically based on a schedule, and in response to user interaction.
We’re picking up right where we left off, so if you don’t have a copy of the widget we created in the first post, then you can download it from GitHub.
Updating Your Layout
The first step is updating our layout to display some data that changes over time. To help us see exactly when our widget receives each update, I’m going to instruct the widget to retrieve and display the current time, whenever it performs an update.
I’m going to add the following to the widget layout:
- A
TextViewthat displays a Last Update label. - A
TextViewthat will display the time of the last update.
While we’re working on the new_app_widget.xml file, I’m also going to add the TextView that’ll eventually allow the user to trigger an update manually:
//Add a ‘Tap to update’ TextView//


//Add a TextView that’ll display our ‘Last Update’ label//


//Add the TextView that’ll display the time of the last update//
Next, define the new string resources that we reference in our layout:
Tap to update
Last Update
%1$s
The @string/time looks different from your typical string, as it’s just a placeholder that’ll be replaced at runtime.
This gives us the finished layout:

Updating Your Widget Based on a Schedule
Since it’s the easiest method to implement, I’m going to start by updating our widget automatically, after a set period of time has elapsed.
When creating this kind of automatic update schedule, 1800000 milliseconds (30 minutes) is the smallest interval you can use. Even if you set your project’s updatePeriodMillis to less than 30 minutes, you widget will still only update once every half an hour.
Deciding how frequently your widget should update is never straightforward. Frequent updates are a greater drain on the device’s battery, but set these updates too far apart and your widget may wind up displaying significantly out of date information to the user.
To find a balance that works for your particular project, you’ll need to test your widget across a range of update frequencies and measure the impact each frequency has on battery life, while monitoring whether the widget’s content ever becomes noticeably out of date.
Since how-frequent-is-too-frequent is one of those frustrating subjective questions where there’s no “right” answer, it can help to get a second opinion by arranging some user testing. You could even setup some A/B testing to check whether certain update frequencies are received more positively than others.
Open your project’s AppWidgetProviderInfo file (res/xml/new_app_widget_info.xml) and you’ll see that it already defines a default update interval of 86400000 milliseconds (24 hours).
android:updatePeriodMillis="86400000"
There are plenty of widgets that only update once every 24 hours, for example a widget that displays the weather forecast might only need to retrieve new information once per day. However, even if your widget does only need to update once per day, this isn’t ideal when testing your app. No-one wants to wait 24 hours just to see whether their onUpdate() method is triggering correctly, so you’ll typically use the shortest possible interval when performing initial testing, and then change this value later, if required.
To make it easier to test our app, I’m going to use the smallest possible interval:
android:updatePeriodMillis="1800000"
Retrieving and Displaying the Current Time
The onUpdate() method is responsible for updating your widget’s Views with new information. If you open your project’s widget provider (java/values/NewAppWidget.java) then you’ll see that it already contains the outline of an onUpdate() method:
   @Override
   public void onUpdate(Context context, AppWidgetManager appWidgetManager, int[] appWidgetIds) {

       // There may be multiple widgets active, so update all of them//

       for (int appWidgetId : appWidgetIds) {
           updateAppWidget(context, appWidgetManager, appWidgetId);
       }
   }
Regardless of whether your widget updates automatically or in response to user interaction, the update process is exactly the same: the widget manager sends a broadcast intent with the ACTION_APPWIDGET_UPDATE action, and the widget-provider class responds by calling the onUpdate() method, which in turn calls the updateAppWidget() helper method.
Once we’ve updated our NewAppWidget.java class to retrieve and display the current time, our project will use this same section of code regardless of how the onUpdate() method is triggered:
import android.appwidget.AppWidgetManager;
import android.appwidget.AppWidgetProvider;
import android.content.Context;
import android.widget.RemoteViews;
import android.app.PendingIntent;
import android.content.Intent;
import android.net.Uri;
import java.text.DateFormat;
import java.util.Date;

public class NewAppWidget extends AppWidgetProvider {

   static void updateAppWidget(Context context,
                               AppWidgetManager appWidgetManager,
                               int appWidgetId) {

//Retrieve the time//

       String timeString =
               DateFormat.getTimeInstance(DateFormat.SHORT).format(new Date());

 //Construct the RemoteViews object//

       RemoteViews views = new RemoteViews(context.getPackageName(), R.layout.new_app_widget);
       views.setTextViewText(R.id.id_value, String.valueOf(appWidgetId));

//Retrieve and display the time//

       views.setTextViewText(R.id.update_value,
               context.getResources().getString(
                       R.string.time, timeString));

       Intent intent = new Intent(Intent.ACTION_VIEW, Uri.parse("https://code.tutsplus.com/"));
       PendingIntent pendingIntent = PendingIntent.getActivity(context, 0, intent, 0);
       views.setOnClickPendingIntent(R.id.launch_url, pendingIntent);
       appWidgetManager.updateAppWidget(appWidgetId, views);
   }

   @Override
   public void onUpdate(Context context, AppWidgetManager appWidgetManager, int[] appWidgetIds) {

 //If multiple widgets are active, then update them all//

       for (int appWidgetId : appWidgetIds) {
           updateAppWidget(context, appWidgetManager, appWidgetId);
       }
   }
}
There’s one problem with the above code: if the user taps the TextView multiple times during the span of a minute, there’ll be no visual indication that the widget has updated, simply because there’s no new time to display. This probably won’t cause problems for your end-users, who are unlikely to sit there, tapping the TextView multiple times per minute and wondering why the time hasn’t changed. However, this may be a problem when testing your app, as it means you’ll have to wait at least 60 seconds in between triggering the onUpdate() method.
To ensure there’s always some kind of visual confirmation that the onUpdate() method has ran successfully, I’m going to display a toast whenever onUpdate() is called:
import android.widget.Toast;
...
...
...

@Override

public void onUpdate(Context context, AppWidgetManager appWidgetManager, int[] appWidgetIds) {
   for (int appWidgetId : appWidgetIds) {
       updateAppWidget(context, appWidgetManager, appWidgetId);
       Toast.makeText(context, "Widget has been updated! ", Toast.LENGTH_SHORT).show();

  }
   }
}

Updating Your Widget in Response to User Action
Our widget will now update automatically once every half an hour, but what about updating in response to user interaction?
We’ve already laid a lot of the groundwork by adding a Tap to Update TextView to our layout and expanding the NewAppWidget.java class to retrieve and display the current time whenever onUpdate() is called.
The only thing left to do is create an Intent with AppWidgetManager.ACTION_APPWIDGET_UPDATE, which is an action that informs the widget that it’s time to update, and then call this Intent in response to the user interacting with the Tap to Update TextView.
Here’s the completed NewAppWidget.java class:
import android.appwidget.AppWidgetManager;
import android.appwidget.AppWidgetProvider;
import android.content.Context;
import android.widget.RemoteViews;
import android.app.PendingIntent;
import android.content.Intent;
import android.net.Uri;
import java.text.DateFormat;
import java.util.Date;
import android.widget.Toast;

public class NewAppWidget extends AppWidgetProvider {
   static void updateAppWidget(Context context,
                               AppWidgetManager appWidgetManager,
                               int appWidgetId) {

//Retrieve the current time//

       String timeString =
               DateFormat.getTimeInstance(DateFormat.SHORT).format(new Date());

       RemoteViews views = new RemoteViews(context.getPackageName(), R.layout.new_app_widget);
       views.setTextViewText(R.id.id_value, String.valueOf(appWidgetId));
       views.setTextViewText(R.id.update_value,
               context.getResources().getString(
                       R.string.time, timeString));

//Create an Intent with the AppWidgetManager.ACTION_APPWIDGET_UPDATE action//

       Intent intentUpdate = new Intent(context, NewAppWidget.class);
       intentUpdate.setAction(AppWidgetManager.ACTION_APPWIDGET_UPDATE);

//Update the current widget instance only, by creating an array that contains the widget’s unique ID//

       int[] idArray = new int[]{appWidgetId};
       intentUpdate.putExtra(AppWidgetManager.EXTRA_APPWIDGET_IDS, idArray);

//Wrap the intent as a PendingIntent, using PendingIntent.getBroadcast()//

       PendingIntent pendingUpdate = PendingIntent.getBroadcast(
               context, appWidgetId, intentUpdate,
               PendingIntent.FLAG_UPDATE_CURRENT);

//Send the pending intent in response to the user tapping the ‘Update’ TextView//

       views.setOnClickPendingIntent(R.id.update, pendingUpdate);
       Intent intent = new Intent(Intent.ACTION_VIEW, Uri.parse("https://code.tutsplus.com/"));
       PendingIntent pendingIntent = PendingIntent.getActivity(context, 0, intent, 0);
       views.setOnClickPendingIntent(R.id.launch_url, pendingIntent);

//Request that the AppWidgetManager updates the application widget//

       appWidgetManager.updateAppWidget(appWidgetId, views);
   }

   @Override
   public void onUpdate(Context context, AppWidgetManager appWidgetManager, int[] appWidgetIds) {
       for (int appWidgetId : appWidgetIds) {
           updateAppWidget(context, appWidgetManager, appWidgetId);
           Toast.makeText(context, "Widget has been updated! ", Toast.LENGTH_SHORT).show();
       }
   }
}
Being able to update a widget on demand can be invaluable when testing your project, as it means you’ll never have to wait for the update interval to elapse. Even if you don’t include this functionality in your finished application, you may want to add a temporary Tap to Update button, just to make your life easier when testing your project.
Creating a Preview Image
Our widget now looks completely different to the widget that Android Studio generated for us automatically, but at the moment it’s still using the auto-generated preview image.

Ideally, your preview image should encourage users to select your widget from the Widget Picker, but at the very least it should be an accurate representation of how your widget actually looks! Currently, our preview image ticks neither of those boxes, so we need to create a new one.
The easiest method, is to use the Widget Preview application that’s included in the Android emulator.
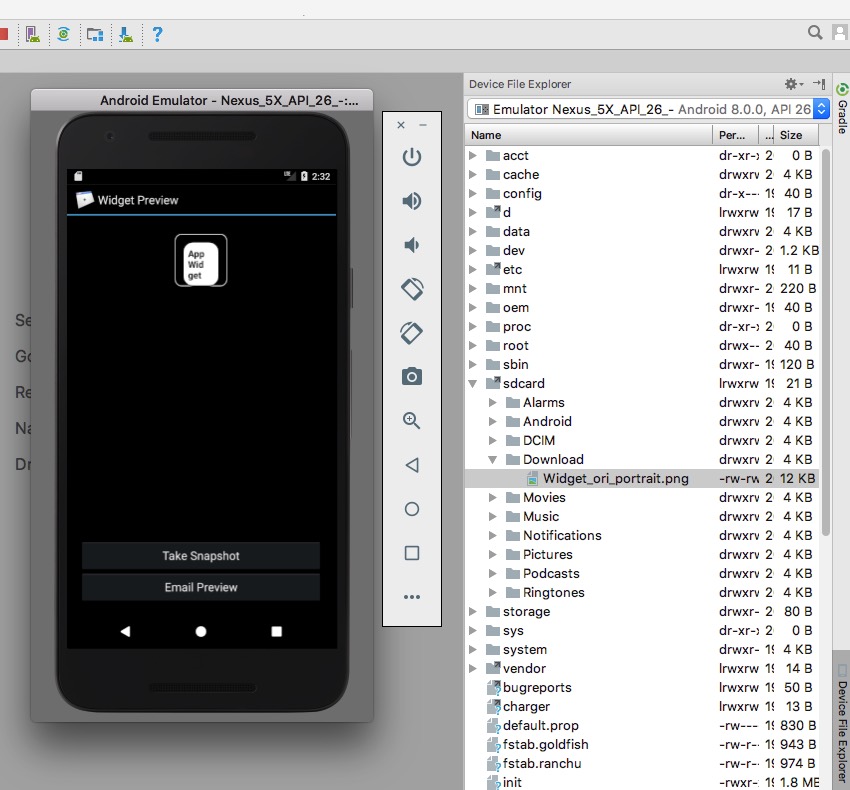
Creating a Widget Preview
First, install your project on an Android Virtual Device (AVD). Then open the AVD’s app drawer and launch the Widget Preview application. The AVD will display a list of every app that’s installed on the device—select your app from the list.
Your widget will be displayed on a blank background. Spend some time resizing and tweaking your widget so that it looks its best, and once you’re happy with the results, select Take Snapshot. The screenshot will be saved as a PNG in the AVD’s Download folder. To retrieve this file, switch back to Android Studio and open the Device File Explorer, by selecting View > Tool Windows > Device File Explorer from the toolbar. In the Device File Explorer view, navigate to the sdcard/Download folder, where you’ll find the preview image saved as: [app_name]_ori_[orientation].png
Drag this image out of Android Studio and drop it somewhere easily accessible, such as your Desktop. Give the image a more descriptive name, then drag and drop the image into your project’s drawable folder. Now you can open the AppWidgetProviderInfo file (in this instance, that’s new_app_widget_info.xml) and change the following line to reference your new preview image:
android:previewImage="@drawable/example_appwidget_preview"
Finally, you can remove the unnecessary example_appwidget_preview drawable from your project.
Testing Your Widget
It’s time to put the finished widget to the test!
First, install the updated project on your physical Android device or AVD. Remove all existing instances of this widget from your homescreen, so you know you’re working with the latest version.
To add your widget, press any empty space on the homescreen, tap Widget and then select your widget. You’ll get a chance to resize and reposition the widget, as necessary.
The Last Update value will display the time that you created this widget. Press Tap to Update and the widget should display a toast and a new time. If you place a second instance of the widget on your homescreen it should display a different time to the first one.

You can update either of these widget instances, by giving its Tap to Update TextView a tap. If you trigger a manual update for the first widget, then the second widget will not be updated, and vice versa.
In addition to manual updates, the App Widget Manager will update all instances of your widget once every 30 minutes, based on the time when you created the first instance. Although manual updates can result in instances displaying different times, once every half an hour all instances will be updated simultaneously, at which point they’ll display the same time.
You may want to keep a few instances of this widget on your homescreen, so you can monitor how their content changes over time in response to a combination of automatic and manual updates.
Conclusion
In this series, we’ve been creating an Android application widget that demonstrates how to implement all the most common features found in app widgets. If you’ve been following along since the beginning, then by this point you’ll have built a widget that updates automatically and in response to user input, and that’s capable of reacting to onClick events (you can also download the complete project from GitHub).
In the next post, we’ll look at some best practices for ensuring your widget provides a good user experience, and how to enhance your widget with a configuration Activity.
 Android SDKWhat Are Android Instant Apps?
 Android SDKCreating Accessible Android Apps
 Android SDKCreate a Material Design Tabbed Interface in an Android App
 Android SDKQuick Tip: Create a Custom Quick Settings Tile for Android
Powered by WPeMatico


