
What Is the Observer Pattern?
The Observer Pattern is a software design pattern that establishes a one-to-many dependency between objects. Anytime the state of one of the objects (the “subject” or “observable”) changes, all of the other objects (“observers”) that depend on it are notified.
Let’s use the example of users that have subscribed to receive offers from Envato Market via email. The users in this case are observers. Anytime there is an offer from Envato Market, they get notified about it via email. Each user can then either buy into the offer or decide that they might not be really interested in it at that moment. A user (an observer) can also subscribe to receive offers from another e-commerce marketplace if they want and might later completely unsubscribe from receiving offers from any of them.
This pattern is very similar to the Publish-Subscribe pattern. The subject or observable publishes out a notification to the dependent observers without even knowing how many observers have subscribed to it, or who they are—the observable only knows that they should implement an interface (we’ll get to that shortly), without worrying about what action the observers might perform.
Benefits of the Observer Pattern
- The subject knows little about its observers. The only thing it knows is that the observers implement or agree to a certain contract or interface.
- Subjects can be reused without involving their observers, and the same goes for observers too.
- No modification is done to the subject to accommodate a new observer. The new observer just needs to implement an interface that the subject is aware of and then register to the subject.
- An observer can be registered to more than one subject it’s registered to.
All these benefits give you loose coupling between modules in your code, which enables you to build a flexible design for your application. In the rest of this post, we’ll look at how to create our own Observer pattern implementation, and we’ll also use the built-in Java Observer/Observable API as well as looking into third-party libraries that can offer such functionality.
Building Our Own Observer Pattern
1. Create the Subject Interface
We start by defining an interface that subjects (observables) will implement.
public interface Subject {
    void registerObserver(RepositoryObserver repositoryObserver);
    void removeObserver(RepositoryObserver repositoryObserver);
    void notifyObservers();
}
In the code above, we created a Java Interface with three methods. The first method registerObserver(), as it says, will register an observer of type RepositoryObserver (we’ll create that interface shortly) to the subject. removeObserver() will be called to remove an observer that wants to stop getting notifications from the subject, and finally, notifyObserver() will send a broadcast to all observers whenever there is a change. Now, let’s create a concrete subject class that will implement the subject interface we have created:
import android.os.Handler;
import java.util.ArrayList;

public class UserDataRepository implements Subject {
    private String mFullName;
    private int mAge;
    private static UserDataRepository INSTANCE = null;

    private ArrayList mObservers;

    private UserDataRepository() {
        mObservers = new ArrayList<>();
        getNewDataFromRemote();
    }

    // Simulate network
    private void getNewDataFromRemote() {
        final Handler handler = new Handler();
        handler.postDelayed(new Runnable() {
            @Override
            public void run() {
                setUserData("Chike Mgbemena", 101);
            }
        }, 10000);
    }

    // Creates a Singleton of the class
    public static UserDataRepository getInstance() {
        if(INSTANCE == null) {
            INSTANCE = new UserDataRepository();
        }
        return INSTANCE;
    }

    @Override
    public void registerObserver(RepositoryObserver repositoryObserver) {
        if(!mObservers.contains(repositoryObserver)) {
            mObservers.add(repositoryObserver);
        }
    }

    @Override
    public void removeObserver(RepositoryObserver repositoryObserver) {
        if(mObservers.contains(repositoryObserver)) {
            mObservers.remove(repositoryObserver);
        }
    }

    @Override
    public void notifyObservers() {
        for (RepositoryObserver observer: mObservers) {
            observer.onUserDataChanged(mFullName, mAge);
        }
    }

    public void setUserData(String fullName, int age) {
        mFullName = fullName;
        mAge = age;
        notifyObservers();
    }
}
The class above implements the Subject interface. We have an ArrayList that holds the observers and then creates it in the private constructor. An observer registers by being added to the ArrayList and likewise, unregisters by being removed from the ArrayList.
Note that we are simulating a network request to retrieve the new data. Once the setUserData() method is called and given the new value for the full name and age, we call the notifyObservers() method which, as it says, notifies or sends a broadcast to all registered observers about the new data change. The new values for the full name and age are also passed along. This subject can have multiple observers but, in this tutorial, we’ll create just one observer. But first, let’s create the observer interface.
2. Create the Observer Interface
public interface RepositoryObserver {
    void onUserDataChanged(String fullname, int age);
}
In the code above, we created the observer interface which concrete observers should implement. This allows our code to be more flexible because we are coding to an interface instead of a concrete implementation. A concrete Subject class does not need to be aware of the many concrete observers it may have; all it knows about them is that they implement the RepositoryObserver interface.
Let’s now create a concrete class that implements this interface.
import android.os.Bundle;
import android.support.v7.app.AppCompatActivity;
import android.widget.TextView;

public class UserProfileActivity extends AppCompatActivity implements RepositoryObserver {
    private Subject mUserDataRepository;
    private TextView mTextViewUserFullName;
    private TextView mTextViewUserAge;

    @Override
    protected void onCreate(Bundle savedInstanceState) {
        super.onCreate(savedInstanceState);
        setContentView(R.layout.activity_user_profile);

        mTextViewUserAge = (TextView) findViewById(R.id.tv_age);
        mTextViewUserFullName = (TextView) findViewById(R.id.tv_fullname);

        mUserDataRepository = UserDataRepository.getInstance();
        mUserDataRepository.registerObserver(this);
    }

    @Override
    public void onUserDataChanged(String fullname, int age) {
        mTextViewUserFullName.setText(fullname);
        mTextViewUserAge.setText(age);
    }

    @Override
    protected void onDestroy() {
        super.onDestroy();
        mUserDataRepository.removeObserver(this);
    }
}
The first thing to notice in the code above is that UserProfileActivity implements the RepositoryObserver interface—so it must implement the method onUserDataChanged(). In the onCreate() method of the Activity, we got an instance of the UserDataRepository which we then initialized and finally registered this observer to.
In the onDestroy() method, we want to stop getting notifications, so we unregister from receiving notifications.
In the onUserDataChanged() method, we want to update the TextView widgets—mTextViewUserFullName and mTextViewUserAge—with the new set of data values.
Right now we just have one observer class, but it’s possible and easy for us to create other classes that want to be observers of the UserDataRepository class. For example, we could easily have a SettingsActivity that wants to also be notified about the user data changes by becoming an observer.
Push and Pull Models
In the example above, we are using the push model of the observer pattern. In this model, the subject notifies the observers about the change by passing along the data that changed. But in the pull model, the subject will still notify the observers, but it does not actually pass the data that changed. The observers then pull the data they need once they receive the notification.
Utilising Java’s Built-In Observer API
So far, we have created our own Observer pattern implementation, but Java has built-in Observer / Observable support in its API. In this section, we are going to use this. This API simplifies some of the implementation, as you’ll see.
1. Create the Observable
Our UserDataRepository—which is our subject or observable—will now extend the java.util.Observable superclass to become an Observable. This is a class that wants to be observed by one or more observers.
import android.os.Handler;
import java.util.Observable;

public class UserDataRepository extends Observable {
    private String mFullName;
    private int mAge;
    private static UserDataRepository INSTANCE = null;

    private UserDataRepository() {
        getNewDataFromRemote();
    }

    // Returns a single instance of this class, creating it if necessary.
    public static UserDataRepository getInstance() {
        if(INSTANCE == null) {
            INSTANCE = new UserDataRepository();
        }
        return INSTANCE;
    }

    // Simulate network
    private void getNewDataFromRemote() {
        final Handler handler = new Handler();
        handler.postDelayed(new Runnable() {
            @Override
            public void run() {
                setUserData("Mgbemena Chike", 102);
            }
        }, 10000);
    }

    public void setUserData(String fullName, int age) {
        mFullName = fullName;
        mAge = age;
        setChanged();
        notifyObservers();
    }

    public String getFullName() {
        return mFullName;
    }

    public int getAge() {
        return mAge;
    }
}
Now that we have refactored our UserDataRepository class to use the Java Observable API, let’s see what has changed compared to the previous version. The first thing to notice is that we are extending a super class (this means that this class can’t extend any other class) and not implementing an interface as we did in the previous section.
We are no longer holding an ArrayList of observers; this is handled in the super class. Similarly, we don’t have to worry about registration, removal, or notification of observers—java.util.Observable is handling all of those for us.
Another difference is that in this class we are employing a pull style. We alert the observers that a change has happened with notifyObservers(), but the observers will need to pull the data using the field getters we have defined in this class. If you want to use the push style instead, then you can use the method notifyObservers(Object arg) and pass the changed data to the observers in the object argument.
The setChanged() method of the super class sets a flag to true, indicating that the data has changed. Then you can call the notifyObservers() method. Be aware that if you don’t call setChanged() before calling notifyObsevers(), the observers won’t be notified. You can check the value of this flag by using the method hasChanged() and clear it back to false with clearChanged(). Now that we have our observable class created, let’s see how to set up an observer also.
2. Create the Observer
Our UserDataRepository observable class needs a corresponding Observer to be useful, so let’s refactor our UserProfileActivity to implement the java.util.Observer interface.
import android.os.Bundle;
import android.support.v7.app.AppCompatActivity;
import android.widget.TextView;
import com.chikeandroid.tutsplusobserverpattern.R;
import java.util.Observable;
import java.util.Observer;

public class UserProfileActivity extends AppCompatActivity implements Observer {
    private Observable mUserDataRepositoryObservable;
    private TextView mTextViewUserFullName;
    private TextView mTextViewUserAge;

    @Override
    protected void onCreate(Bundle savedInstanceState) {
        super.onCreate(savedInstanceState);
        setContentView(R.layout.activity_user_profile);

        mTextViewUserAge = (TextView) findViewById(R.id.tv_age);
        mTextViewUserFullName = (TextView) findViewById(R.id.tv_fullname);

        mUserDataRepositoryObservable = UserDataRepository.getInstance();
        mUserDataRepositoryObservable.addObserver(this);
    }

    @Override
    public void update(Observable observable, Object o) {
        if (observable instanceof UserDataRepository) {
            UserDataRepository userDataRepository = (UserDataRepository)observable;
            mTextViewUserAge.setText(String.valueOf(userDataRepository.getAge()));
            mTextViewUserFullName.setText(userDataRepository.getFullName());
        }
    }

    @Override
    protected void onDestroy() {
        super.onDestroy();
        mUserDataRepositoryObservable.deleteObserver(this);
    }
}
In the onCreate() method, we add this class as an observer to the UserDataRepository observable by using the addObserver() method in the java.util.Observable super class.
In the update() method which the observer must implement, we check if the Observable we receive as a parameter is an instance of our UserDataRepository (note that an observer can subscribe to different observables), and then we cast it to that instance and retrieve the values we want using the field getters. Then we use those values to update the view widgets.
When the activity is destroyed, we don’t need to get any updates from the observable, so we’ll just remove the activity from the observer list by calling the method deleteObserver().
Libraries to Implement an Observer Pattern
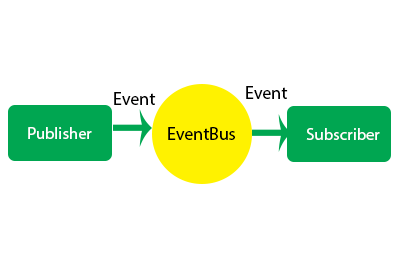
If you don’t want to build your own Observer pattern implementation from scratch or use the Java Observer API, you can use some free and open-source libraries that are available for Android such as Greenrobot’s EventBus. To learn more about it, check out my tutorial here on Envato Tuts+.
.png) AndroidCommunication Within an Android App With EventBus
AndroidCommunication Within an Android App With EventBus
Or, you might like RxAndroid and RxJava. Learn more about them here:
 AndroidGetting Started With ReactiveX on Android
Conclusion
In this tutorial, you learned about the Observer pattern in Java: what is it, the benefits of using it, how to implement your own, using the Java Observer API, and also some third-party libraries for implementing this pattern.
In the meantime, check out some of our other courses and tutorials on the Java language and Android app development!
 Android SDKRxJava 2 for Android Apps: RxBinding and RxLifecycle
 Android SDKPractical Concurrency on Android With HaMeR
 AndroidEnsure High-Quality Android Code With Static Analysis Tools
 Android SDKCreate an Intelligent App With Google Cloud Speech and Natural Language APIs


