

The material design team at Google defines the functionality of a navigation drawer in Android as follows:
The navigation drawer slides in from the left and contains the navigation destinations for your app.
An example of a popular Android app that implements the navigation drawer is the Inbox app from Google, which uses a navigation drawer to navigate to different sections of the application. You can check it yourself by downloading the Inbox app from the Google Play store, if you don’t already have it on your device. The screenshot below shows Inbox with the navigation drawer pulled open.

The user can view the navigation drawer when they swipe a finger from the left edge of the activity. They can also find it from the home activity (the top level of the app), by tapping the app icon (also known as the “hamburger” menu) in the action bar.
Note that if you have many different destinations (more than six, say) in your app, it’s recommended that you use a navigation drawer.
In this post, you’ll learn how to display navigation items inside a navigation drawer in Android. We’ll cover how to use the DrawerLayout and NavigationView API to perform this task. For a bonus, you’ll also learn how to use the Android Studio templates feature to quickly bootstrap your project with a navigation drawer.
A sample project (in Kotlin) for this tutorial can be found on our GitHub repo so you can easily follow along.
Prerequisites
To be able to follow this tutorial, you’ll need:
- Android Studio 3.0 or higher
- Kotlin plugin 1.1.51 or higher
1. Create an Android Studio Project
Fire up Android Studio and create a new project (you can name it NavigationDrawerDemo) with an empty activity called MainActivity. Make sure to also check the Include Kotlin support check box.

2. Adding the DrawerLayout and NavigationView
To begin using DrawerLayout and NavigationView in your project, you’ll need to import the design support and also the Android support artifact. So add these to your module’s build.gradle file to import them.
dependencies {
    implementation 'com.android.support:design:27.0.2'
    implementation 'com.android.support:support-v4:27.0.2'
}
Also, include both the DrawerLayout widget and also the NavigationView widget in your res/layout/activlty_main.xml file.
Here we created a DrawerLayout widget with the id drawer_layout. The tools:openDrawer property is used to display the navigation drawer when the XML layout is open in Android Studio design view.
The official documentation says the following about DrawerLayout:
DrawerLayoutacts as a top-level container for window content that allows for interactive “drawer” views to be pulled out from one or both vertical edges of the window.
After adding the DrawerLayout widget, we included a child layout which points to @layout/app_bar_main.
Here is my app_bar_main.xml resource file. This file simply has a CoordinatorLayout, an AppBarLayout, and a Toolbar widget.
Finally, we created a NavigationView widget. The official documentation says the following about NavigationView:
NavigationViewrepresents a standard navigation menu for application. The menu contents can be populated by a menu resource file.
In the NavigationView XML widget, you can see that we added an android:layout_gravity attribute with value start. This is used to position the drawer—you want the drawer to come out from left or right (the start or end on platform versions that support layout direction). In our own case, the drawer will come out from the left.
We also included an app:headerLayout attribute which points to @layout/nav_header_main. This will add a View as a header of the navigation menu.
Here is my nav_header_main.xml layout resource file:
This layout file simply has a LinearLayout, an ImageView, and a TextView.

To include the menu items for the navigation drawer, we can use the attribute app:menu with a value that points to a menu resource file.
Here is the res/menu/activity_main_drawer.xml menu resource file:
Here we have defined a Menu using the
- a parent context—for example, in an
Activityyou usethis, while in aFragmentyou callgetActivity() - an instance of the
DrawerLayoutwidget to link to the activity’sActionBar - the icon to place on top of the app icon to indicate that there is a toggle
- the string resources for the open and close operations respectively (for accessibility)
We invoked the method addDrawerListener() on a DrawerLayout so as to connect an ActionBarDrawerToggle with a DrawerLayout.
Note that we also enable the app icon via setHomeButtonEnabled() and enable it for “up” navigation via setDisplayHomeAsUpEnabled().
We then forward the onPostCreate(), onConfigurationChanged(), and onOptionsItemSelected() activity callback methods on to the toggle:
class MainActivity : AppCompatActivity() {

    // ...

    override fun onPostCreate(savedInstanceState: Bundle?) {
        super.onPostCreate(savedInstanceState)
        toggle.syncState()
    }

    override fun onConfigurationChanged(newConfig: Configuration?) {
        super.onConfigurationChanged(newConfig)
        toggle.onConfigurationChanged(newConfig)
    }

    override fun onOptionsItemSelected(item: MenuItem?): Boolean {
        if (toggle.onOptionsItemSelected(item)) {
            return true
        }
        return super.onOptionsItemSelected(item)
    }
}
Here is what the syncState() does, according to the official documentation:
Synchronizes the state of the drawer indicator/affordance with the linked DrawerLayout… This should be called from your
Activity‘sonPostCreatemethod to synchronize after the DrawerLayout’s instance state has been restored, and any other time when the state may have diverged in such a way that the ActionBarDrawerToggle was not notified. (For example, if you stop forwarding appropriate drawer events for a period of time.)
4. Testing the App
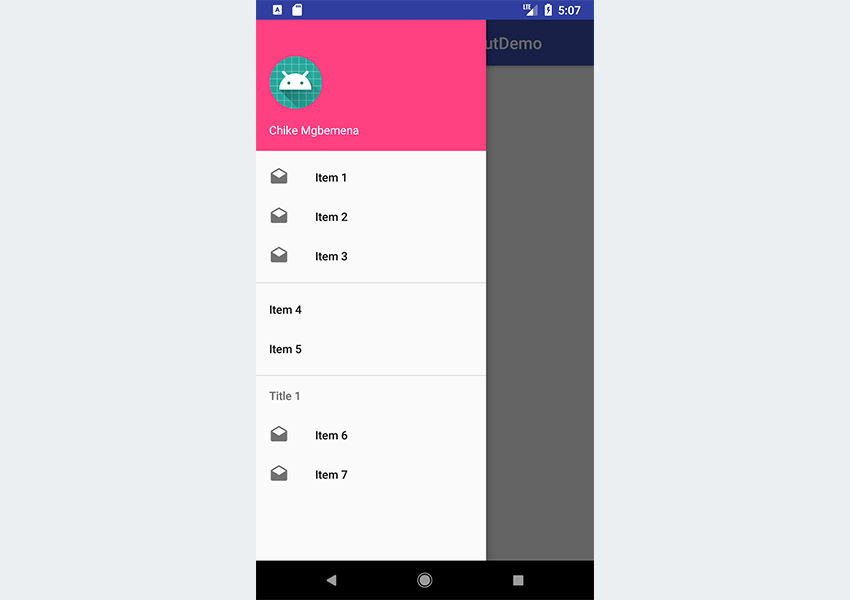
At this point, we can run the app!

As you can see, launching the app will show the “hamburger” navigation drawer icon in the action bar. Try tapping this app icon to open the drawer. Also, clicking on the navigation drawer items won’t do anything—we’re going to handle that part in the next section.
5. Handling Click Events
Now, let’s see how to handle click events for each of the items in the navigation drawer. Note that clicking on any item is supposed to take you to a new Activity or Fragment—that’s why it’s called a navigation drawer!
First, your activity needs to implement the NavigationView.OnNavigationItemSelectedListener.
class MainActivity : AppCompatActivity(), NavigationView.OnNavigationItemSelectedListener {
    // ...
}
By implementing this contract or interface, we must now override the only method: onNavigationItemSelected().
class MainActivity : AppCompatActivity(), NavigationView.OnNavigationItemSelectedListener {

    // ...

    override fun onNavigationItemSelected(item: MenuItem): Boolean {

        when (item.itemId) {
            R.id.nav_item_one -> Toast.makeText(this, "Clicked item one", Toast.LENGTH_SHORT).show()
            R.id.nav_item_two -> Toast.makeText(this, "Clicked item two", Toast.LENGTH_SHORT).show()
            R.id.nav_item_three -> Toast.makeText(this, "Clicked item three", Toast.LENGTH_SHORT).show()
            R.id.nav_item_four -> Toast.makeText(this, "Clicked item four", Toast.LENGTH_SHORT).show()
        }
        return true
    }
}
This method is invoked when an item in the navigation menu is selected. We used the when expression to perform different actions based on the menu item that was clicked—the menu item ids serve as constants for the when expression.
Next, we have to initialize our NavigationView and set this listener inside onCreate() of our activity.
class MainActivity : AppCompatActivity(), NavigationView.OnNavigationItemSelectedListener {
    // ...
    override fun onCreate(savedInstanceState: Bundle?) {
        // ...
        val navigationView: NavigationView = findViewById(R.id.nav_view)
        navigationView.setNavigationItemSelectedListener(this)
        // ...
    }
// ...
Run the project again!

When you click on some items, a toast message is displayed—just what we expected. But remember that clicking on an item should take the user to a new Activity or Fragment (we ignored this here for brevity’s sake).
You will notice that when you click on an item, the drawer still remains. It would be better if it closed automatically anytime an item was clicked. Let’s see how to do that.
override fun onNavigationItemSelected(item: MenuItem): Boolean {

    when (item.itemId) {
        R.id.nav_item_one -> Toast.makeText(this, "Clicked item one", Toast.LENGTH_SHORT).show()
        R.id.nav_item_two -> Toast.makeText(this, "Clicked item two", Toast.LENGTH_SHORT).show()
        R.id.nav_item_three -> Toast.makeText(this, "Clicked item three", Toast.LENGTH_SHORT).show()
        R.id.nav_item_four -> Toast.makeText(this, "Clicked item four", Toast.LENGTH_SHORT).show()
    }
    drawer.closeDrawer(GravityCompat.START)
    return true
}
To close the drawer after a link has been clicked, simply invoke closeDrawer() on an instance of DrawerLayout and pass GravityCompat.START to the method.
Run the project one more time and see the result!
6. Handling the Back Button Being Pressed
When the drawer is open, it would be a better user experience not to close the home activity if the Back button is pressed. This is the way popular apps like Google’s Inbox app work.
So, when the drawer is open and the Back button is pressed, only close the drawer instead of the current home activity. Then, if the user presses the Back button again, the home activity should be closed.
Here’s how we can achieve this:
override fun onBackPressed() {
    if (drawer.isDrawerOpen(GravityCompat.START)) {
        drawer.closeDrawer(GravityCompat.START)
    } else {
        super.onBackPressed()
    }
}
Run the project again and test it out!
7. Bonus: Using Android Studio Templates
Now that you have learnt about the APIs involved to create a navigation drawer, I’ll show you a shortcut that will make it faster next time. You can simply use a template instead of coding a navigation drawer Activity from scratch.
Android Studio provides code templates that follow the Android design and development best practices. These existing code templates (available in Java and Kotlin) can help you quickly kick-start your project. One such template can be used to create a navigation drawer activity.
I’ll show you how to use this handy feature in Android Studio.
For a new project, fire up Android Studio.

Enter the application name and click the Next button.
You can leave the defaults as they are in the Target Android Devices dialog. Click the Next button again.

In the Add an Activity to Mobile dialog, scroll down and select Navigation Drawer Activity. Click the Next button after that.

In the last dialog, you can rename the Activity name, layout name or title if you want. Finally, click the Finish button to accept all configurations.
Android Studio has now helped us to create a project with a navigation drawer activity. Really cool!
You are strongly advised to explore the code generated.
You can use templates for an already existing Android Studio project too. Simply go to File > New > Activity > Navigation Drawer Activity.

The templates that come included with Android Studio are good for simple layouts and making basic apps, but if you want to kick-start your app even further, you might consider some of the app templates available from Envato Market.
They’re a huge time saver for experienced developers, helping them to cut through the slog of creating an app from scratch and focus their talents instead on the unique and customised parts of creating a new app.
Conclusion
In this tutorial, you learned how to create a navigation drawer in Android using the DrawerLayout and NavigationView API from scratch. We also explored how to easily and quickly use the Android Studio templates to create a navigation drawer.
I highly recommend checking out the official material design guidelines for navigation drawers to learn more about how to properly design and use navigation drawers in Android.
To learn more about coding for Android, check out some of our other courses and tutorials here on Envato Tuts+!
 Android SDKBuild a Music App With an Android App Template
 Android SDKSimplify Android App Development With Anko
 Android SDKCreate a Material Design Tabbed Interface in an Android App
 App Templates15 Best Android App Templates of 2017
 Android SDKCode an Image Gallery Android App With Glide
Powered by WPeMatico


